


The Vyatta project has been dead for a few months. A very promising fork exists, called VyOS! Easily migrate your Vyatta to VyOS Hydrogen.
Table of contents
Real-world use case
The Vyatta project has been discontinued: here's how to migrate your routers to its community fork, VyOS Hydrogen.
The VyOS fork
VyOS is a fork of Vyatta; it takes over from the Vyatta project, which is no longer developed.
Migrating from Vyatta to VyOS is very simple, the official wiki will guide us.
Migrating from Vyatta to VyOS
Before diving into the Vyatta to VyOS migration, take some precautions (you never know).
Remember to back up your configuration files (with rsync) to another server:
rsync -e ssh -az /config/config.boot root@your_server:/home/user
rsync -e ssh -az /config/scripts/vyatta-postconfig-bootup.script  root@your_server:/home/user
Now go into a directory on your Vyatta system:
cd /tmp/
Download VyOS's public key:
wget http://vyos.net/so3group_maintainers.key
Add the public key to the system's keyring:
apt-key add so3group_maintainers.key
=> OK
Currently, here's the system image that's running (Vyatta 6.6R1):
show system image
=> Old-non-image-installation (default boot) (running image)
Checking the Linux system's architecture is important for selecting VyOS:
cat /proc/version
=> Linux version 3.3.8-1-amd64-vyatta[...]
Adding VyOS's 1.0.4 image will therefore be the 64-bit version from the UK mirror:
add system image http://0.uk.mirrors.vyos.net/iso/release/1.0.4/vyos-1.0.4-amd64.iso
During image installation, a few questions appear:
What would you like to name this image? [1.0.4]: vyos-1.0.4
OK.  This image will be named: vyos-1.0.4
Installing "1.0.4" image.
Copying new release files...
Would you like to save the current configuration
directory and config file? (Yes/No) [Yes]: Yes
Copying current configuration...
Would you like to save the SSH host keys from your
current configuration? (Yes/No) [Yes]: Yes
Copying SSH keys...
Setting up grub configuration...
Done.
Let's now check the system images currently installed:
show system image
=> The system currently has the following image(s) installed:

   1: vyos-1.0.4 (default boot) (running image)
   2: Old-non-image-installation
VyOS is selected by default when grub boots, let's reboot our current system:
reboot
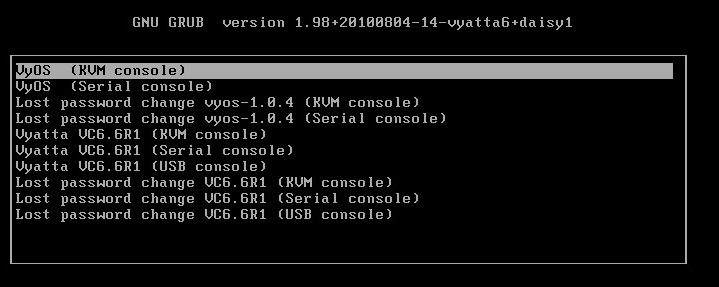
Grub shows us two systems: VyOS (default) and Vyatta 6.6R1 (old):
When the system boots, we notice:
Welcom to VyOS - vyatta tty1
vyatta login :
My system's hostname is called vyatta, we can change it:
configure
set system host-name vyos
commit
save
We're getting closer to VyOS's default configuration:
Welcom to VyOS - vyos tty1
vyos login :
If you'd like to go further in that direction, all you need to do now is add the vyos user as admin:
set system login user vyos level admin
set system login user vyos authentication plaintext-password pass4wd
delete system login user vyatta
commit
save
The migration is complete! If you'd like, you can remove Vyatta's system image:
delete system image Old-non-image-installation
To wrap up, note that the migration is impressively simple and that VyOS is very stable!
For more information, check out the official website and VyOS's twitter.
Conclusion
This article covered migrating a Vyatta 6.6R1 router to its free fork, VyOS Hydrogen: backing up the configuration, adding the key and VyOS system image, then switching the hostname and users to the new default configuration. Since the Vyatta project is no longer maintained, this migration lets you keep benefiting from updates and active community support via VyOS. The process turned out to be simple and the final system stable, with no configuration loss.