

Discover how Veeam for Linux backs up my KVM/QEMU infrastructure.

Real-world use case
You need to reliably back up a fleet of KVM/QEMU VMs: here's how Veeam for Linux protects my infrastructure.
Backing up my KVM/QEMU machines
For many years, all my services have run on Linux systems. They've become essential to me day to day, particularly for managing my personal data and, more generally, in my work as an administrator. So I wanted to be able to resume my activity in case of a problem: software instability, cyberattack, or simply a human error on my part. I therefore set out to review my backup plan, which follows the 1-2-3 rule:
- Have at least three copies of your data.
- Store these copies on two different media.
- Keep one copy of the backup off-site.
In my plan, I chose the Veeam for Linux solution, which is free and available at this link. To keep exploring what the solution offers, I also use Veeam Backup & Replication v9.5 U2, Veeam's (paid) management console, which I won't cover in this article.
Table of contents
- The disaster recovery plan on the KVM/QEMU host
- VM backups: image mode
- Installing Veeam for Linux on Debian 8
- Conclusion on my backup plan
The disaster recovery plan on the KVM/QEMU host
The centerpiece is my KVM/QEMU hypervisor installed on a dedicated HP DL160G8 server.
In case of a problem, it needs to be quickly restorable via ILO. I decided to back up all my partitions (except for /var/libvirt/libvirt/images, which contains the VMs).
Here are my different backup locations:
Location 1Location 2Location 3 A remote directory:
via NFS with ACLA remote directory:
via FTP with ACLAn encrypted drive
kept at my home
Example: my server is faulty or unable to run:
- Launch the Online.net console to activate ILO.
- Boot the server from the Veeam Recovery Media ISO.
- Recover my volumes via my repository accessible over NFS.
VM backups: image mode
For many years now, virtualization has allowed the creation of snapshots that freeze the state of a machine at a given moment, letting you move and extract any changes to a second, temporary location. The libvirt API lets me easily perform these backup steps with a homemade script, but I decided to run image-mode backups of the entire Linux system using the Veeam for Linux agent. How does it work?
- The agent is installed on all the virtual machines.
- The backup is configured to back up the entire VM (image mode).
- The backup is performed to the destination: Veeam Backup & Replication, hosted on a Windows Server VM.
Location 1Location 2Location 3
A local VM:
to the Windows V: drive
A remote directory:
via FTPAn encrypted drive
kept at my home.
Example: a VM is faulty or unable to run:
- Force restart the virtual machine.
- Recover my volumes via the Veeam Backup & Replication application.
- Or boot from the Veeam Recovery Media ISO.
- Recover my volumes via the Windows repository.
Installing Veeam for Linux on Debian 8.
The installation is very simple, even though it requires 1GB of memory and certain dependencies, here they are:
apt-get install install dkms gcc make perl libudev-dev libacl1 libattr1-dev lvm2 libfuse-dev linux-headers-$(uname -r)
The ports used by Veeam are documented on the helpcenter page. In my case, communication between my KVM host and the NFS server requires opening port 2051. As for the VMs, they'll need to communicate with the Veeam server via port 10002, and ports 2500 to 5000 to perform the backups.
Downloading the Veeam software repository is available at this link.
Start installing the package and run a repository update:
dpkg -i ./veeam-release* && apt-get update
Installing Veeam is now available:
apt-get install veeeam
The result should look like this:
Reading package lists... Done
Building dependency tree
Reading state information... Done
The following extra packages will be installed:
  veeamsnap
The following NEW packages will be installed:
  veeam veeamsnap
0 upgraded, 2 newly installed, 0 to remove and 1 not upgraded.
Need to get 22.8 MB of archives.
After this operation, 51.8 MB of additional disk space will be used.
Do you want to continue? [Y/n] Y
Get: 1 http://repository.veeam.com/backup/linux/agent/dpkg/debian/x86_64/ noname/veeam veeamsnap all 1.0.0.944 [71.1 kB]
Get: 2 http://repository.veeam.com/backup/linux/agent/dpkg/debian/x86_64/ noname/veeam veeam amd64 1.0.0.944 [22.8 MB]
Fetched 22.8 MB in 1s (20.5 MB/s)
Selecting previously unselected package veeamsnap.
(Reading database ... 58604 files and directories currently installed.)
Preparing to unpack .../veeamsnap_1.0.0.944_all.deb ...
Unpacking veeamsnap (1.0.0.944) ...
Selecting previously unselected package veeam.
Preparing to unpack .../veeam_1.0.0.944_amd64.deb ...
Unpacking veeam (1.0.0.944) ...
Processing triggers for man-db (2.7.0.2-5) ...
Processing triggers for systemd (215-xxxxxx+xxxx) ...
Setting up veeamsnap (1.0.0.944) ...
Loading new veeamsnap-1.0.0.944 DKMS files...
First Installation: checking all kernels...
Building only for 3.xx.xx-x-amd64
Building initial module for 3.xx.xx-x-amd64
Done.

veeamsnap:
Running module version sanity check.
 - Original module
   - No original module exists within this kernel
 - Installation
   - Installing to /lib/modules/3.xx.xx-x-amd64/updates/dkms/

depmod............

DKMS: install completed.
Setting up veeam (1.0.0.944) ...
I ran into a problem on one VM when launching the veeamsnap module, an error code appears:
Failed to load module [veeamsnap] with parameters [zerosnapdata=1 debuglogging=0].
To fix the problem, here's what to do:
dkms status
veeamsnap, 1.0.0.944, 3.xx.xx-x-amd64, x86_64: installed
It needs to be removed, rebuilt, and reinstalled for it to load normally afterward:
dkms remove -m veeamsnap/1.0.0.944 --all
dkms build -m veeamsnap -v 1.0.0.944
dkms install -m veeamsnap -v 1.0.0.944
Installing Veeam for Linux on Debian 8 is complete. From now on, the main command for creating a job is:
veeam
Veeam Agent for Linux shows up in the terminal, offering to use the product for free or with a license:
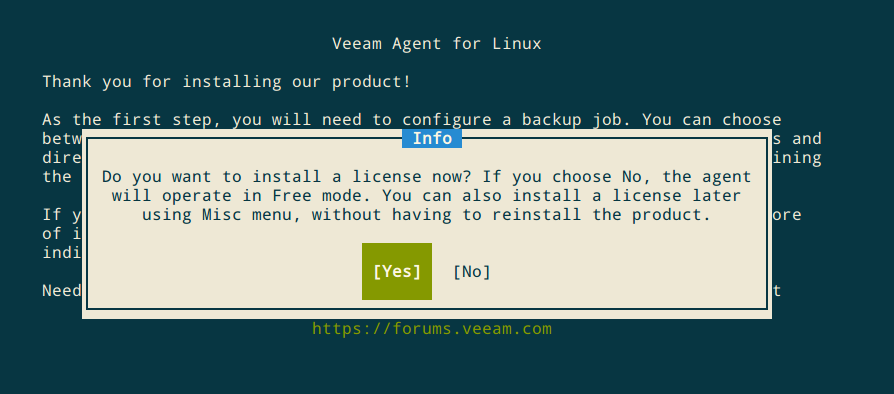
You're now all set to build your own backup plan with the Veeam For Linux solution.
For command-line instructions: creating a job, deleting one, etc… it's over here.
Conclusion on my backup plan
I believe the hardest part isn't choosing the backup solution, but really thinking through the backup plan itself. If needed, that plan will inevitably guide the choice of backup solution.