

Get a simple interface on Raspberry Pi. Discover lightweight, simple tools. Add some color to your favorite raspberry.
Real-world use case
You want a lightweight, custom-tailored interface on your Raspberry Pi: here's how to customize Arch Linux ARM.
This article aims to be simple and quick, it won't go into detail.
We'll try to get a fairly smooth interface for our Raspberry Pi.
To do this, we'll use the following packages:
– Slim is a connection manager.
– OpenBox is a window manager.
– Nitrogen lets you manage wallpapers.
– Screenfetch displays information in the terminal.
– Tint2 adds a taskbar (optional).
– pcmanfm is a lightweight file manager, which can also manage your desktop.
– lxeappearance lets you manage the system's themes, icons, and fonts.
– midori is a minimalist web browser.
Installing the prerequisites:
Before diving into configuring these programs, we need to install them:
pacman -S slim openbox obconf obmenu nitrogen screenfetch tint2 pcmanfm lxeappearance midori
The "xinitrc" file needs to be configured for slim:
nano /home/jeremie/.xinitrc
Add this to automatically start "openbox":
exec openbox-session
Create an "openbox" folder:
mkdir -p ~/.config/openbox
Copy the "openbox" configuration files:
cp -R /etc/xdg/openbox/* ~/.config/openbox
Launch "openbox" for the first time:
exec openbox-session
On the first launch, a blank screen appeared, you can do the following:
- Right-clicking the desktop brings up the OpenBox menu.
- Clicking the middle button will list all open applications.
- The mouse wheel lets you show active windows and switch from one desktop to another.
- Windows shortcuts work, e.g.: "Alt + tab" or "Alt + F4".
Configuring OpenBox
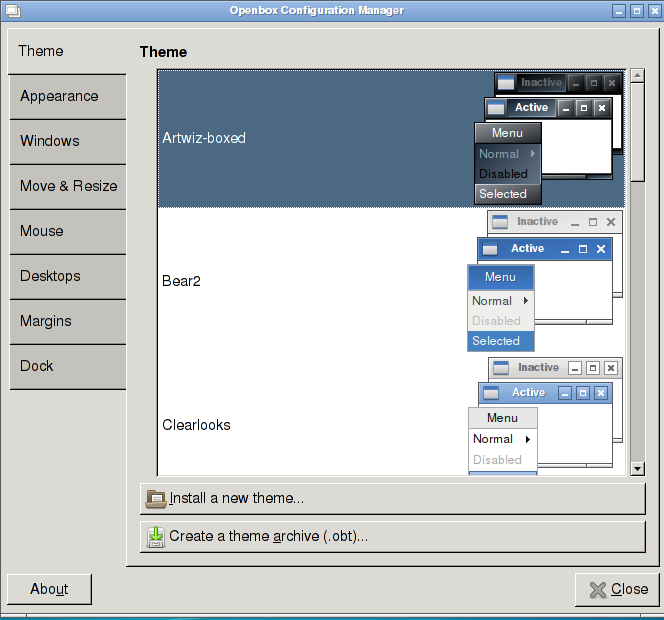
Launching the "openbox" configuration:
obconf
The screenshot below should appear:
Select your themes, the number of desktops to use, adjust your usage preferences, etc.
Launch "obmenu" in the terminal to modify your entries in the "openbox" menu:
obmenu
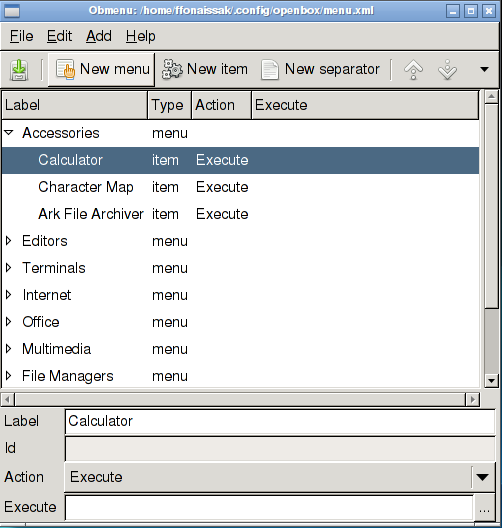
You can also edit the "menu.xml" file directly by hand:
nano /home/jeremie/.config/openbox/menu.xml
More information: http://doc.ubuntu-fr.org/openbox
Adding wallpapers to Nitrogen
Nitrogen lets you choose a wallpaper by specifying the folder path like this:
nitrogen ~/openbox/wallpapers/ &
The taskbar with tint2 (optional)
OpenBox offers a so-called floating bar with a middle-click.
For those who want it, you can use a fixed taskbar with "tint2".
To launch the "tint2" process in the background:
tint2 &
This command loads "tint2" with the base configuration file.
Launching "tint2" in the background with a configuration file:
tint2 -c ~/openbox/config/tint2rc &
This command loads "tint2" with a configuration file of your choice.
Here's a configuration file for "tint2":
#---------------------------------------------
# TINT2 CONFIG FILE
#---------------------------------------------

#---------------------------------------------
# BACKGROUND AND BORDER
#---------------------------------------------
rounded = 0
border_width = 0
background_color = #000000 100
border_color = #414140 100

rounded = 0
border_width = 0
background_color = #1F262E 100
border_color = #232426 100

rounded = 0
border_width = 0
background_color = #000000 100
border_color = #232426 100

#---------------------------------------------
# PANEL
#---------------------------------------------
panel_monitor = all
panel_position = bottom center
panel_size = 100% 26
panel_margin = 0 6
panel_padding = 2 0
panel_items = TSC
font_shadow = 0
panel_background_id = 1
wm_menu = 1

#---------------------------------------------
# TASKBAR
#---------------------------------------------
taskbar_mode = single_monitor
#taskbar_mode = multi_desktop
#taskbar_mode = all
taskbar_padding = 0 0 0
taskbar_background_id = 0

#---------------------------------------------
# TASKS
#---------------------------------------------
task_icon = 1
task_text = 1
task_width = 200
task_centered = 0
task_padding = 10 5
task_font = Droid Sans bold 9
task_font_color = #ffffff 70
task_active_font_color = #ffffff 100
task_background_id = 3
task_active_background_id = 2

#---------------------------------------------
# LAUNCHER
#---------------------------------------------
launcher_padding = 0 0 3
launcher_background_id = 1
launcher_icon_size = 24
# Specify icon theme names with launcher_icon_theme.
# if you have an XSETTINGS manager running (like xfsettingsd), tint2 will follow your current theme.
launcher_icon_theme = AwOkaenza II
# Each launcher_item_app must be a full path to a .desktop file
launcher_item_app = /home/moon/.dock/nautilus.desktop
launcher_item_app = /home/moon/.dock/nautilus-musique.desktop
launcher_item_app = /home/moon/.dock/firefox.desktop
launcher_item_app = /home/moon/.dock/pidgin.desktop
launcher_item_app = /home/moon/.dock/gmusicbrowser.desktop

#---------------------------------------------
# SYSTRAYBAR
#---------------------------------------------
systray_padding = 2 4 5
systray_background_id = 1

#---------------------------------------------
# CLOCK
#---------------------------------------------
time1_format = %d.%m.%y // %H:%M
time1_font = DroidSans Bold 9
clock_font_color = #ffffff 70
clock_padding = 6 4
clock_background_id = 1
clock_lclick_command = orage
#clock_rclick_command =

#---------------------------------------------
# BATTERY
#---------------------------------------------
#battery = 0
#battery_low_status = 7
#battery_low_cmd = notify-send "battery low"
#bat1_font = sans 8
#bat2_font = sans 6
#battery_font_color = #ffffff 76
#battery_padding = 1 0
#battery_background_id = 0

#---------------------------------------------
# MOUSE
#---------------------------------------------
mouse_middle = close
mouse_right = none
mouse_scroll_up = toggle
mouse_scroll_down = iconify
There are tons of configuration files on the internet.
I recommend you create your own configuration file, it's much more fun!
Info in the terminal with Screenfetch
Screenfetch shows information in the terminal, to add it:
nano /home/jeremie/.bashrc
Add the line at the end of the file:
screenfetch
Restart your terminal and enjoy the change!
The pcmanfm window manager
Pcmanfm is very lightweight, it's well suited to the Raspberry Pi, and it can also manage your desktop!
For Pcmanfm to manage your desktop, you need to run the following command:
pcmanfm --desktop &
To make it nicer, download an icon pack:
pacman -S faenza-icon-theme
Managing your graphical interface with Lxappearance
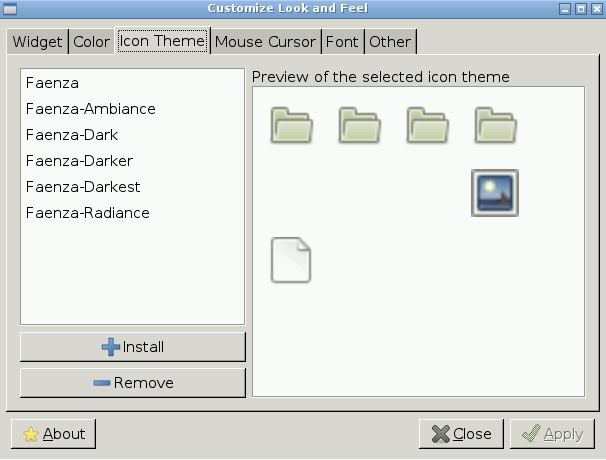
Lxappearance lets you manage icons, the mouse cursor, and much more:
Launch Lxappearance with xterm:
lxappearance
By default the icon pack is fairly simple. Add the "Faenza" icons of your choice:
Launch your entire configuration at startup
To launch applications at startup, you need to add to the end of the "autostart.sh" file:
nano ~/.config/openbox/autostart.sh
# Restore the last wallpaper
nitrogen --restore &

# Start the Tint taskbar
sleep 2 && tint2 -c ~/openbox/tint2rc &
Don't forget to make your script executable:
chmod +x ~/.config/openbox/autostart.sh
The script should be adapted based on your preferences, your configuration, and your skill level.
In the end, it's difficult to have a smooth interface on our raspberry, nothing beats the terminal!
Conclusion
This customization of Arch Linux ARM on the Raspberry Pi sets up a lightweight graphical environment with Slim, OpenBox, Nitrogen for wallpapers, Tint2 for the taskbar, and pcmanfm/Lxappearance for managing the desktop and themes. The goal was to achieve a simple, smooth interface despite the raspberry's limited resources, while keeping control over every component. In the end, the terminal remains the most efficient tool on this kind of hardware.