


Security rules under junOS are effective, simple, and fast. A hands-on introduction with a real-world example using Firefly Perimeter.

Real-world use case
You need to segment the network flows of a Juniper infrastructure: here's how to configure effective security rules under JunOS.
Juniper Firefly Perimeter
The evolution of IT systems toward virtualization requires adapting the approach to protecting virtual resources. Juniper's Firefly Perimeter solution addresses this exact need, mirroring the security of SRX gateways. It offers compatibility with VMware and KVM hypervisors:
The price is relatively low for Firefly Perimeter, around €500 without options, compared to Brocade Vyatta v5400 at €1800 (public price).
Downloading Firefly Perimeter
There are two download scenarios: either your license is valid and tied to your account, or you simply want to try the product with a sixty-day evaluation version. Each of these options requires a valid Juniper account.
- First case: valid license tied to the account
Once in my account, I go to the All products tab, which contains a link named Download Software.
A list appears, I select By series then Firefly Perimeter:
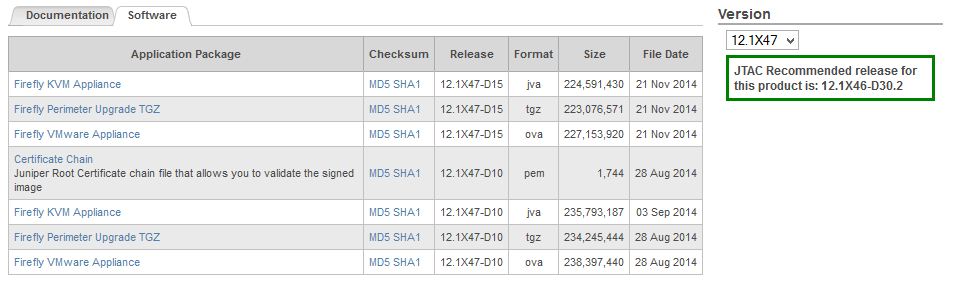
I use the VMware appliance dated November 1, 2014:
Firefly VMware Appliance MD5 SHA112.1X47-D15ova227,153,92021 Nov 2014
If an error appears, it's because you're not authorized to download the package (so download it via the product sheet below).
- Second case: invalid license, need for an evaluation version
Head to the Firefly Perimeter product page then click the Evaluation tab of Firefly Perimeter.
The choice will fall on OVA file (for the Firefly Perimeter VMware appliance) then click Software:
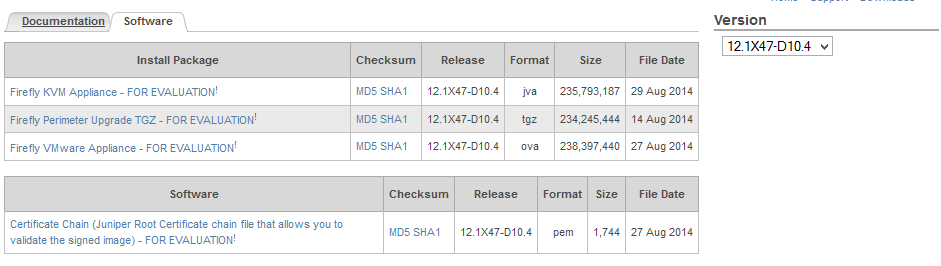
The appliance will be deployed via the vSphere client software on Windows, in: Files and Deploy OVF Template.
Setting up the network infrastructure
The virtual infrastructure will have access to the internet via an IP block provided by OVH, and will consist of 3 distinct LAN networks.
Here's an example of the desired setup with a diagram and a single WAN IP:
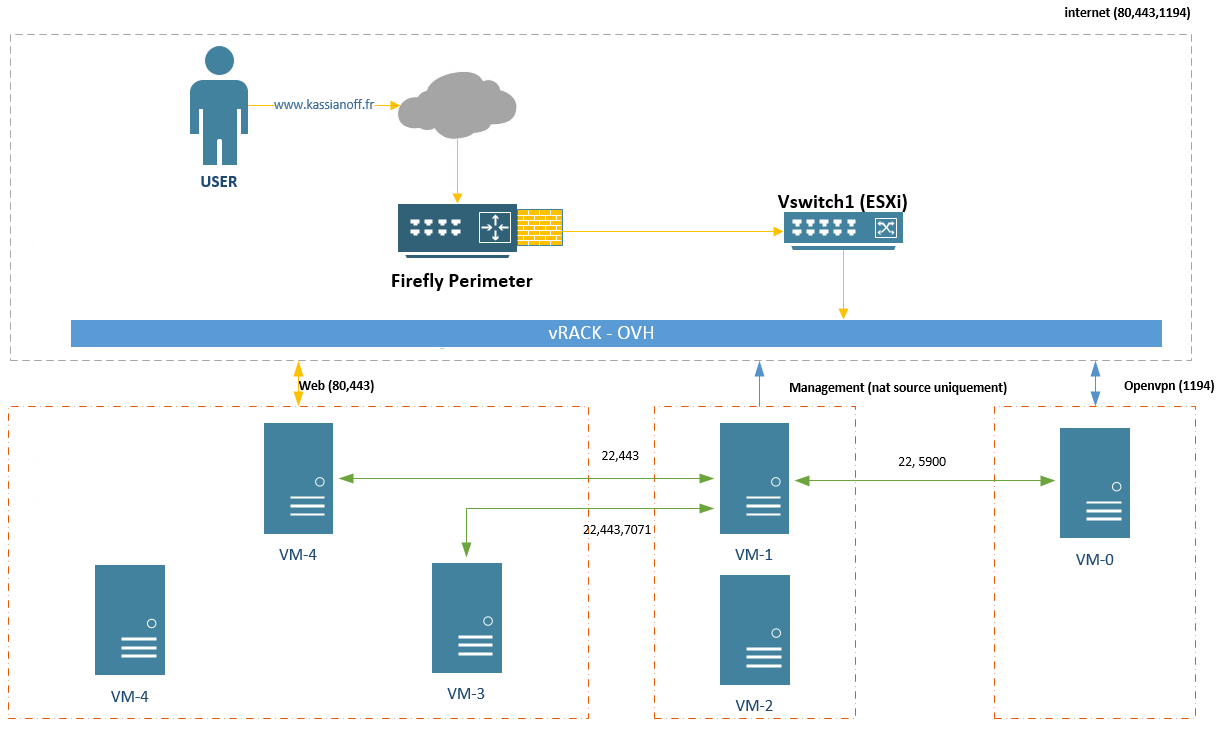
More information on the official website: documentation.
First contact with Firefly Perimeter
To start, we'll simply use the following command:
root@% config-wizard
Follow the guide:
Enter host name : firefly-kassianoff

Please enter root password:
Retype root password:

Would you like to configure domain name? [yes,no] (no): no
 Enter domain name: X.X.X.X

Would you like to configure name server? [yes, no] (no):
 Enter IP address for the name server : 213.186.33.99

Would you like to configure alternative name server? [yes, no] (no): yes
 Enter IP address for the name server: 213.186.33.199

Configure the following network interfaces

Identifier      Interface
    1           ge-0/0/0
    2           ge-0/0/1
    3           ge-0/0/2
    4           ge-0/0/3

Would you like to configure any of the above interfaces? [yes,no] (yes): 1

Enter one or more identifiers from the above interfaces separated by commas.
For example, 1,2,3

Please select interface identifiers: 1

  Configure IP on interface ge-0/0/0

    IP address for this interface: 178.30.70.49               # fictional IP block at 178.30.70.48/29
    Subnet mask bit length for this interface [1-32]: 29

Would you like to configure default gateway? [yes, no] (no): yes
    Enter IP address for the default gateway: 178.30.70.54

Would you like to create a new user account? [yes,no] (no): no

No new user was configured.

Would you like to configure SNMP Network Management? [yes,no] (no): no

SNMP Network Management was not configured

Would you like to review configuration commands? [yes,no] (no): yes

Would you like to commit the initial configuration and exit? [yes,no]: yes
The summary of the commands is as follows:
set system host-name firefly-kassianoff
set system root-authenfication encrypted-password-value "*******"
set system name-server 8.8.8.8
set interfaces ge-0/0/0 unit 0 family inet address 178.30.70.49/29
set system services web-management http
set system services telnet
set system services ssh
set routing-options tatic route 0.0.0.0/0 next-hop 178.30.70.54
Base configuration
We now move on to the proper configuration for it to work:
configure
Let's add the external interface to the internet security zone:
set security zones security-zone internet interfaces ge-0/0/0.0
Let's allow the system's SSH service traffic in the internet zone:
set security zones security-zone internet host-inbound-traffic system-services ssh
From the outside, we'll therefore have SSH access, but don't forget to fine-tune a few settings:
set system services ssh protocol-version v2
set system services ssh rate-limit 3 connection-limit 3
Configuring the LAN interfaces spread across their respective zones:
set interfaces ge-0/0/1 description web
set interfaces ge-0/0/1 unit 0 family inet address 192.168.10.1/29
set interfaces ge-0/0/2 description management
set interfaces ge-0/0/2 unit 0 family inet address 192.168.20.1/29
set interfaces ge-0/0/3 description openvpn
set interfaces ge-0/0/3 unit 0 family inet address 192.168.30.1/29
Detail regarding the public interface:
set interfaces ge-0/0/0 description WAN-01
Security configuration
Creating the different zones: Web, Management, and Openvpn
set security zones security-zone web
set security zones security-zone web interfaces ge-0/0/1
set security zones security-zone management
set security zones security-zone management interfaces ge-0/0/2
set security zones security-zone openvpn
set security zones security-zone openvpn interfaces ge-0/0/3
Adding the external address to the pool:
set security nat source pool wan-01 address 178.30.70.49/32
Setting up Source NAT for:
set security nat source rule-set 1 rule 1-1 match source-address 192.168.10.0/29
set security nat source rule-set 1 rule 1-1 then source-nat pool wan-01
set security nat source rule-set 1 rule 1-2 match source-address 192.168.20.0/29
set security nat source rule-set 1 rule 1-2 then source-nat pool wan-01
set security nat source rule-set 1 rule 1-3 match source-address 192.168.30.0/29
set security nat source rule-set 1 rule 1-3 then source-nat pool wan-01
Also, a simpler and faster way:
set security nat source rule-set 1 rule 1-1 match source-address [ 192.168.10.0/29 192.168.20.0/29 192.168.30.0/29 ]
set security nat source rule-set 1 rule 1-1 then source-nat pool wan-01
Setting up Destination NAT for:
- External access from 178.30.70.49:80 to 192.168.10.1:80
set security nat destination pool Web-80 address 192.168.10.2/32 port 80
set security nat destination rule-set 1 from interface ge-0/0/0.0
set security nat destination rule-set 1 rule 1-1 match destination-address 178.30.70.49/32
set security nat destination rule-set 1 rule 1-1 match destination-port 80
set security nat destination rule-set 1 rule 1-1 match protocol tcp
set security nat destination rule-set 1 rule 1-1 then destination-nat pool Web-80
- External access from 178.30.70.49:443 to 192.168.10.1:443
set security nat destination pool Web-443 address 192.168.10.2/32 port 443
set security nat destination rule-set 2 from interface ge-0/0/0.0
set security nat destination rule-set 2 rule 2-1 match destination-address 178.30.70.49/32
set security nat destination rule-set 2 rule 2-1 match destination-port 443
set security nat destination rule-set 2 rule 2-1 match protocol tcp
set security nat destination rule-set 2 rule 2-1 then destination-nat pool Web-443
External access via 178.30.70.49:1194 to 192.168.10.1:1194
set security nat destination pool Openvpn-1194 address 192.168.30.2/32 port 1194
set security nat destination rule-set 3 from interface ge-0/0/0.0
set security nat destination rule-set 3 rule 3-1 match destination-address 178.30.70.49/32
set security nat destination rule-set 3 rule 3-1 match destination-port 1194
set security nat destination rule-set 3 rule 3-1 match protocol tcp
set security nat destination rule-set 3 rule 3-1 then destination-nat pool Openvpn-1194
Declaring our different addresses in the address book:
set security address-book global address wan-01 178.30.70.49/32
set security address-book global address server-web 192.168.10.2/32
set security adress-book global address server-management 192.168.20.2/32
set security address-book global address server-openvpn 192.168.30.2/32
Setting up the inter-zone security policies:
- Internet to Web
set security policies from-zone internet to-zone web policy nat-dest-web match source-address any
set security policies from-zone internet to-zone web policy nat-dest-web match destination-address server-web
set security policies from-zone internet to-zone web policy nat-dest-web match application any
set security policies from-zone internet to-zone web policy nat-dest-web then permit
- Web to Internet
set security policies from-zone web to-zone internet policy nat-dest-internet match source-address server-web
set security policies from-zone web to-zone internet policy nat-dest-internet match destination-address any
set security policies from-zone web to-zone internet policy nat-dest-internet match application any
set security policies from-zone web to-zone internet policy nat-dest-internet then permit
- Internet to Openvpn
set security policies from-zone internet to-zone openvpn policy nat-dest-openvpn match source-address any
set security policies from-zone internet to-zone openvpn policy nat-dest-openvpn match destination-address server-openvpn
set security policies from-zone internet to-zone openvpn policy nat-dest-openvpn match application any
set security policies from-zone internet to-zone openvpn policy nat-dest-openvpn then permit
- Openvpn to Internet
set security policies from-zone openvpn to-zone internet policy nat-dest-internet match source-address server-openvpn
set security policies from-zone openvpn to-zone internet policy nat-dest-internet match destination-address any
set security policies from-zone openvpn to-zone internet policy nat-dest-internet match application any
set security policies from-zone openvpn to-zone internet policy nat-dest-internet then permit
We notice that the match application condition contains specific applications, and in my case that doesn't suit me. So we need to create our different applications, which we'll then use between the Management and Openvpn zones, for example:
set applications application tcp22 destination-port 22
set applications application tcp5900 destination-port 5900
- Management to Openvpn
set security policies from-zone management to-zone openvpn policy nat-dest-openvpn match source-address server-management
set security policies from-zone management to-zone openvpn policy nat-dest-openvpn match destination-address server-openvpn
set security policies from-zone management to-zone openvpn policy nat-dest-openvpn match application [ tcp22 tcp5900 ]
set security policies from-zone management to-zone openvpn policy nat-dest-openvpn then permit
- Openvpn to Management
set security policies from-zone openvpn to-zone management policy nat-dest-management match source-address server-openvpn
set security policies from-zone openvpn to-zone management policy nat-dest-management match destination-address server-management
set security policies from-zone openvpn to-zone management policy nat-dest-management match application [tcp22 tcp5900]
set security policies from-zone openvpn to-zone management policy nat-dest-management then permit
You just need to do the same thing between the Web and Management zones, it's your turn now!
Conclusion
This Firefly Perimeter configuration sets up a virtualized security gateway: internet/web/management/openvpn zones, source and destination NAT, addresses, and inter-zone security policies. This approach lets you secure several distinct LAN networks behind a single public IP while keeping fine-grained control over allowed traffic. It's a good, economical alternative to physical SRX appliances for anyone wanting to virtualize their perimeter security.