


OpenIAM is an open-source identity management solution. Discover how to interconnect this solution with LDAPS.

Real-world use case
You need to centralize identity management in a secure way: here's how to configure OpenIAM with LDAPS.
Configuring OpenIAM with LDAPS
OpenIAM is an identity and access management solution for enterprise management. It's an ideal integration solution for cloud-type dematerialized services. It's simple and effective to implement, thanks in particular to the open standard it uses. The solution is promoted as one of the best professional management solutions, since it lets partners, sales teams, or clients manage identities, modify them, or delete them.
In this article, we'll cover a case of interconnection with Windows Active Directory in secure mode: LDAPS connector. The OpenIAM server will run on CentOS 6.7, while the ldaps server will run on Windows 2008R2. To better understand our solution, here's a diagram:
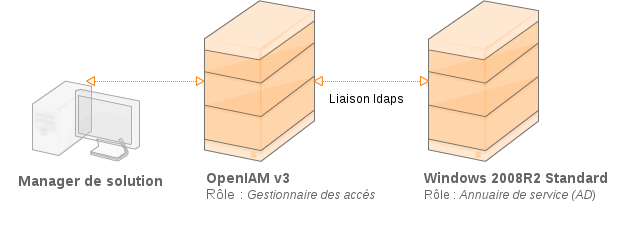
Info: Our OpenIAM machine's configuration must be 4 CPUs, 6GB of RAM, and 10GB of disk space.
Discover for yourself:
- Installing the prerequisites.
- Installing OpenIAM on CentOS.
- Installing a root certificate on Windows (LDAPS).
- Configuring the LDAPS connector.
Installing the prerequisites
We're on a CentOS distribution in Desktop mode. We use the yum package manager:
yum update
Once the software update is complete, you'll need to install two essential pieces of software: Java JDK 1.7 and MySQL 5.1.
Java JDK 1.7 on CentOS
It's important to choose the right Java version, so head to the opt folder:
cd /opt/
Next, download the jdk-7u79-linux-x64.tar.gz file:
wget --no-cookies --no-check-certificate --header "Cookie: gpw_e24=http%3A%2F%2Fwww.oracle.com%2F; oraclelicense=accept-securebackup-cookie" "http://download.oracle.com/otn-pub/java/jdk/7u79-b15/jdk-7u79-linux-x64.tar.gz"
Then, extract the compressed archive:
tar xzf jdk-7u79-linux-x64.tar.gz
Install it in the current directory:
cd /opt/jdk1.7.0_79/
At this exact moment, we're going to use alternatives, which let us specify the version of Java to install:
alternatives --install /usr/bin/java java /opt/jdk1.7.0_79/bin/java 2
alternatives --config java

There are 3 programs which provide "java".

  Selection    Command
-----------------------------------------------
*+ 1           /usr/lib/jvm/jre-1.7.0-openjdk.x86_64/bin/java
   2           /usr/lib/jvm/jre-1.6.0-openjdk.x86_64/bin/java
   3           /opt/jdk1.7.0_79/bin/java

Enter to keep the current selection [+], or type selection number:3
Check the version currently in use, so it matches the version supported by OpenIAM:
java -version

java version "1.7.0_79"
Java(TM) SE Runtime Environment (build 1.7.0_79-b15)
Java HotSpot(TM) 64-Bit Server VM (build 24.79-b02, mixed mode)
MySQL 5 on CentOS
Installing the DBMS is also an essential prerequisite. To do so, we just need to install mysql-server:
yum install mysql-server
Resolved dependencies

=================================================================================================
 Package                    Architecture       Version                    Repository       Size
=================================================================================================
Installing:
 mysql-server               x86_64             5.1.73-5.el6_6             base             8.6 M
Installing for dependency:
 mysql                      x86_64             5.1.73-5.el6_6             base             894 k
 perl-DBD-MySQL             x86_64             4.013-3.el6                base             134 k
 perl-DBI                   x86_64             1.609-4.el6                base             705 k

Transaction Summary
=================================================================================================
Install     4 Package(s)

Total download size: 10 M
Installed size: 29 M
Is this ok [y/N]: y
As soon as our installation finishes, you need to manually put the server into production with the command:
mysql_secure_installation
A result appears: there are choices to follow like this:
Enter current password for root (enter for none):
OK, successfully used password, moving on...

Setting the root password ensures that nobody can log into the MySQL
root user without the proper authorisation.

Set root password? [Y/n] y
New password:
Re-enter new password:
Password updated successfully!
Reloading privilege tables..
 ... Success!

By default, a MySQL installation has an anonymous user, allowing anyone
to log into MySQL without having to have a user account created for
them.  This is intended only for testing, and to make the installation
go a bit smoother.  You should remove them before moving into a
production environment.

Remove anonymous users? [Y/n] y
 ... Success!

Normally, root should only be allowed to connect from 'localhost'.  This
ensures that someone cannot guess at the root password from the network.

Disallow root login remotely? [Y/n] y
 ... Success!

By default, MySQL comes with a database named 'test' that anyone can
access.  This is also intended only for testing, and should be removed
before moving into a production environment.

Remove test database and access to it? [Y/n] y
 - Dropping test database...
 ... Success!
 - Removing privileges on test database...
 ... Success!

Reloading the privilege tables will ensure that all changes made so far
will take effect immediately.

Reload privilege tables now? [Y/n] y
 ... Success!

Cleaning up...

All done!  If you've completed all of the above steps, your MySQL
installation should now be secure.

Thanks for using MySQL!
Once the MySQL installation and hardening steps are done, run the following test:
mysql -u root -p

Enter password:
Welcome to the MySQL monitor.  Commands end with ; or g.
Your MySQL connection id is 12
Server version: 5.1.73 Source distribution

Copyright (c) 2000, 2013, Oracle and/or its affiliates. All rights reserved.

Oracle is a registered trademark of Oracle Corporation and/or its
affiliates. Other names may be trademarks of their respective
owners.

Type 'help;' or 'h' for help. Type 'c' to clear the current input statement.

mysql>
To exit MySQL:
mysql> exit
Starting automatic services on CentOS
For the mysqld and jbossas7 (Java server) services to start automatically, you need to use chkconfig:
/sbin/chkconfig --levels 235 mysqld on
/sbin/chkconfig jbossas7 on
Info: At this exact point, you can reboot the server and check your processes.
Installing OpenIAM on CentOS
Now, we need to create an account on OpenIAM's website at the following address: register openiam.
Download the archive named RHEL / CentOS 6.x .- OpenIAM_unix_3_3_3_RELEASE.sh.
wget
Run the following command to launch the installation:
sh OpenIAM_unix_3_3_3_RELEASE.sh
testing JVM in /usr ...
Starting Installer ...
Summary of the GUI installation steps:
- Destination /opt/OpenIAM
- Automatic extraction of files into the destination folder.
- Selecting the installation type: 1.Tier (jboss Only, Full application).
- Selecting the database type: MySQL with only the admin credentials to add.
- Selecting the selfservice localhost address: port 9080.
- Configuring the activation link: change the port to 9080 instead of 8080 since we're using jboss Only.
- Enter your SMTP settings.
- Check or uncheck sending an email.
- At the end, an installation popup appears to notify us to run the password generation.
At this exact moment, we head to OpenIAM's destination directory:
cd /opt/OpenIAM/
Run the OpenIAM server's startup script:
sh start_jboss.sh
Before being able to use OpenIAM, check the logs:
service jbossas7 log
Wait a few minutes for the .deployed files to become visible in:
cd /opt/OpenIAM/jboss/jboss-as-7.1.1.Final/standalone/deployments
In the log file, the result looks like:
[MDC] Finished deploying webconsole.war, result: webconsole.war.deployed
After a few minutes, you'll be able to run this:
cd /opt/OpenIAM/utility
sh generate_password.sh

Properties are found. loading...
Generating master key...
Generating master key successfully finished
Installing a root certificate on Windows for ldaps
We'll now need to create a trusted root certificate on Windows Server 2008R2 so communication is encrypted over ldaps.
Summary of the steps:
- Launch Windows Server Manager.
- Add the role: Active Directory Certificate Services.
- Add the Certification Authority role services from the Role Services screen.
- When choosing the CA, select: Enterprise.
- The CA type is: root.
- A new private key request is needed.
- The encryption method choice appears (minimum 2048-bit key).
- Then you need to choose a certificate name.
- Finish the installation & reboot the Windows server.
We need to export the certificate since it will let us link the identity manager (OpenIAM) with Active Directory. To do this, launch the Windows CMD, then run the following command:
certutil -ca.cert certificatSSL.cer
The certificate is directly exported to the current folder, by default in your user folder, e.g.:
C:/Users/my_account
Now, you'll need to transfer your certificatSSL.cer certificate to the OpenIAM server.
Info: I invite you to use WinSCP or FileZilla via the SFTP protocol (enable the SSH server)
Configuring the certificate in OpenIAM
In our example, we'll use the certificatSSL.cer certificate, which we transferred to the following directory:
/home/my_account/ssl/
Rename the certificate to:
mv certicatSSL.cer adcert.ca
To import the certificate into java, head to the tool's folder:
cd /opt/jdk1.7.0_79/jre/bin/
With the keytool utility, launch the import:
./keytool -import -alias adcert -keystore /usr/java/jdk1.7.0_79/jre/lib/security/cacerts -file /opt/OpenIAM/data/openiam/conf/backup_ssl/adcert.ca

Enter keystore password:
Re-enter new password:
Owner: CN=ldap-CA, DC=ldap, DC=kassianoff, DC=fr
Issuer: CN=ldap-CA, DC=ldap, DC=kassianoff, DC=fr
Serial number: *******************************
Valid from: Tue Dec 15 12:51:34 CET 2015 until: Tue Dec 15 13:01:33 CET 2020
Certificate fingerprints:
     MD5:  /
     SHA1 : /
     SHA256 : /
     Signature algorithm name: SHA1withRSA
     Version : 3

Extensions:

#1: ObjectId: 1.3.6.1.4.1.300.24.0 Criticality=false
0000: 02 01 00                                           ...

#2: ObjectId: 2.5.29.19 Criticality=true
BasicConstraints:[
  CA:true
  PathLen:2147481400
]

#3: ObjectId: 2.5.29.15 Criticality=false
KeyUsage [
  DigitalSignature
  Key_CertSign
  Crl_Sign
]

#4: ObjectId: 2.5.29.14 Criticality=false
SubjectKeyIdentifier [
KeyIdentifier [
0000: / .....?x..X.X'.0
0010: /                                       I.Vc
]
]

Trust this certificate? [no] :  yes
Check that the certificate was successfully imported on the server:
./keytool -list -v -keystore /opt/jdk1.7.0_79/jre/lib/security/cacerts
Edit the security file:
nano /opt/OpenIAM/data/openiam/conf/securityconf.proprietes
Here's the configuration to put on the first line:
KEYSTORE=${confpath}/conf/cacerts
Then stop the OpenIAM solution:
cd /opt/OpenIAM/ && sh stop_jboss.sh
After a few minutes, restart the script:
sh start_jboss.sh
You're now able to configure OpenIAM securely with Active Directory.
Configuring the LDAPS connector
Now you need to connect to OpenIAM's web admin interface to install the connector.
Head to the admin URL via https://localhost:9080/webconsole with the default credentials:
- Username: sysadmin
- Password: passwd000
Info: As soon as you log in for the first time, OpenIAM informs us that we need to change our password.
Next, head to the Provisioning section, then Managed System, to create a New Managed System:
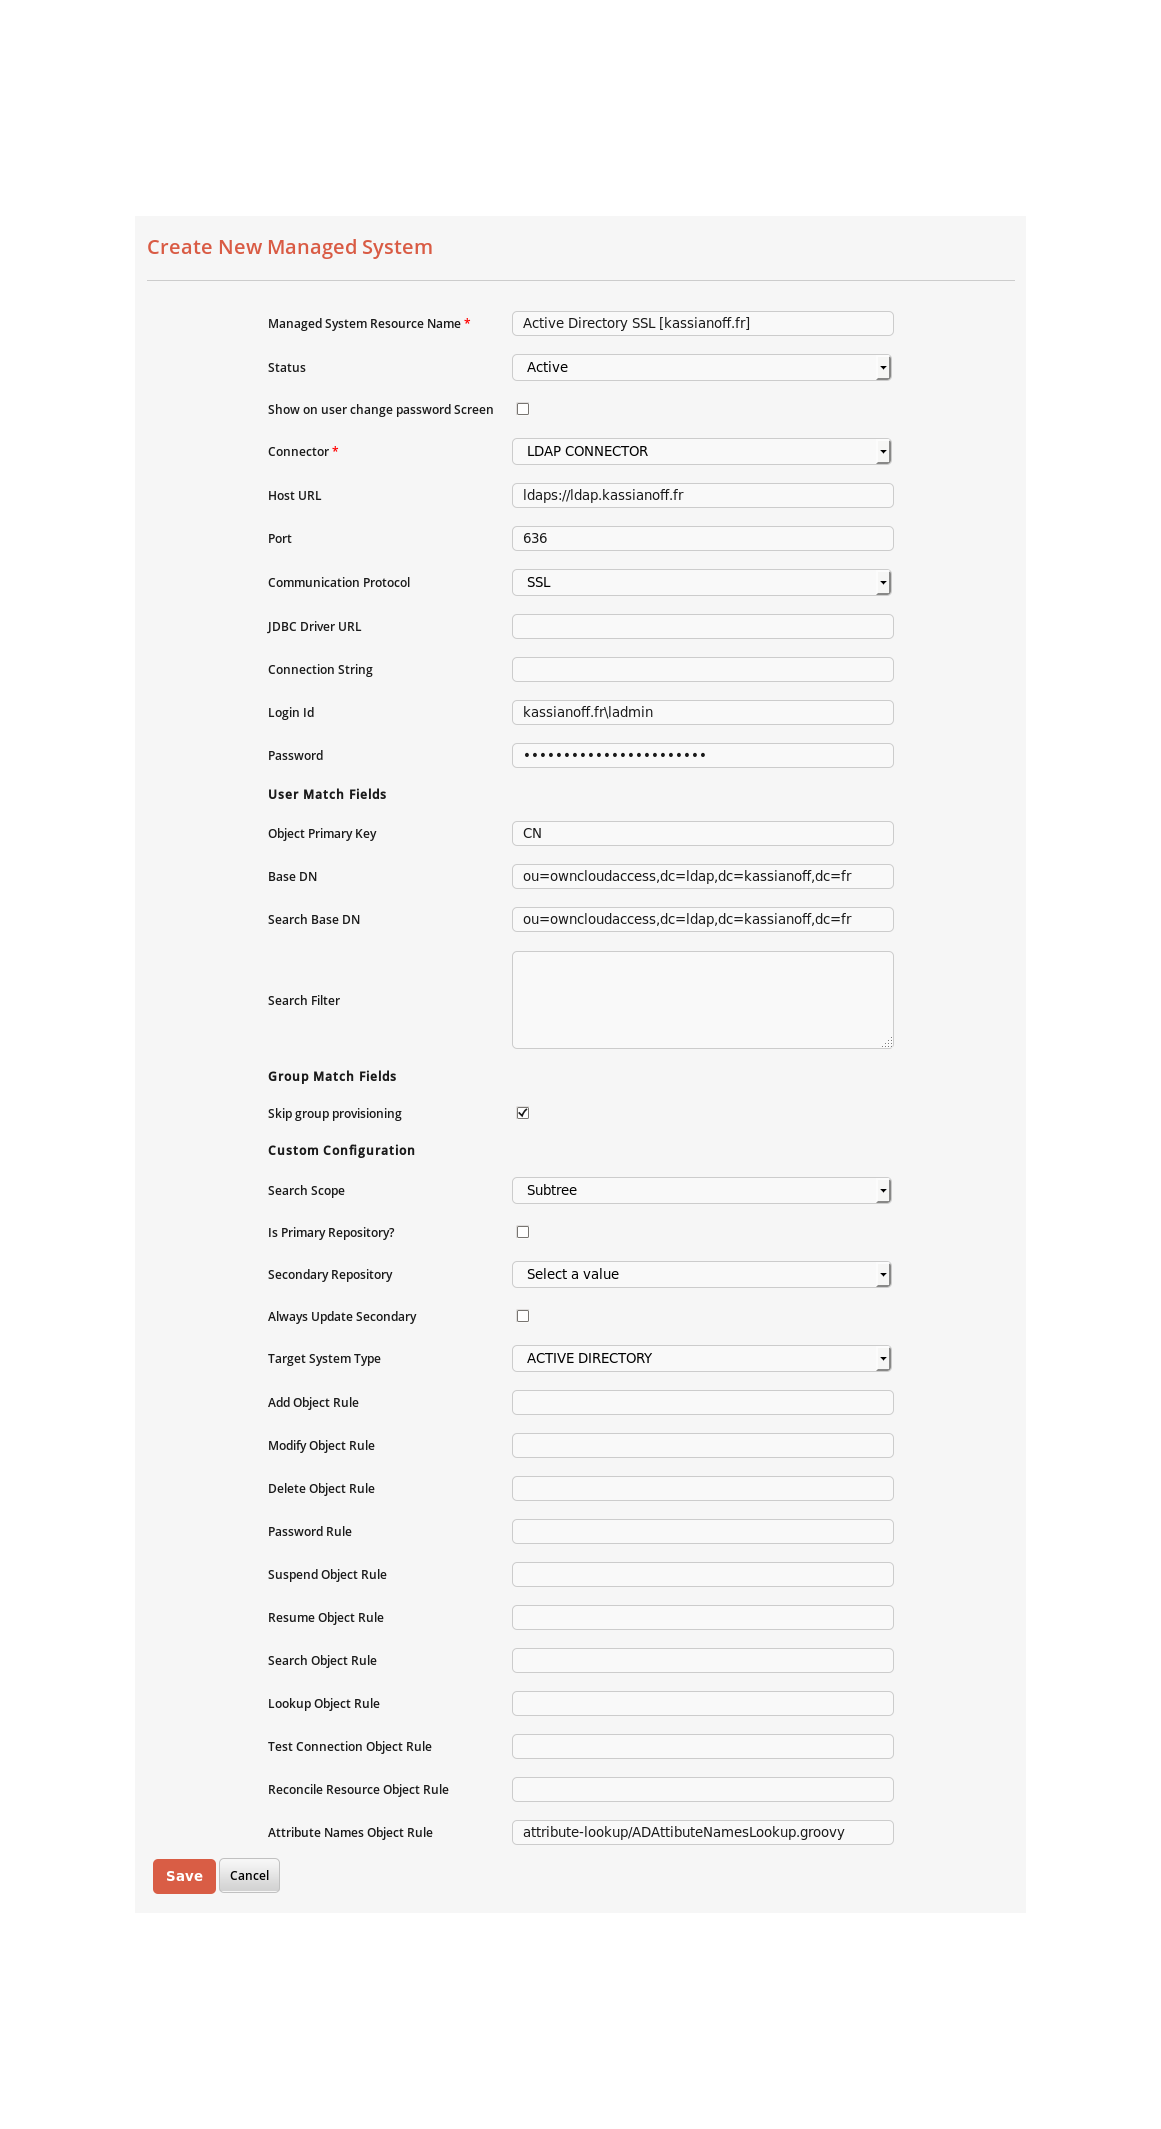
Success! I now invite you to save and run an SSL request, then test the ldaps connection: OK.