


TeamSpeak 3 is an excellent VOIP client/server, perfectly suited for online gaming. Easily install a TeamSpeak 3 server on Linux.
Real-world use case
You want to talk over voice with your gaming community with no latency: here's how to install a TeamSpeak 3 server.
TeamSpeak 3 is a voice communication server for online gaming.
The program is optimized for conversations with large groups of people.
TeamSpeak 3 is multi-platform and works as a client/server.
The sound quality is clear and designed to use very little bandwidth.
This article covers a simple installation of the TeamSpeak 3 server on Debian 7.
Adding a web interface to manage the TeamSpeak server will also be explained.
Creating a user for TeamSpeak 3
The "teamspeak" user will be used to manage the server:
useradd teamspeak
mkdir /home/teamspeak
chown -R teamspeak:teamspeak /home/teamspeak
Downloading the TeamSpeak 3 server
In our user's directory, let's start downloading the server.
Head to the official site to download the server (depending on your distribution).
wget http://dl.4players.de/ts/releases/3.0.10.1/teamspeak3-server_linux-amd64-3.0.10.1.tar.gz
Installing the TeamSpeak 3 server
Extracting the whole archive:
tar xvfz teamspeak3-server_linux-amd64-3.0.10.1.tar.gz
Renaming the archive:
mv teamspeak3-server_linux-amd64-3.0.10.1 ts3server
Moving into the "ts3server" folder:
cd ts3server
Starting the server with the "ts3server" script:
sh ts3server_startscript.sh start
Here's the result of running the script:
------------------------------------------------------------------
                      I M P O R T A N T
------------------------------------------------------------------
               Server Query Admin Account created
         loginname= "serveradmin", password= "xxxxxxxx"
------------------------------------------------------------------

------------------------------------------------------------------
                      I M P O R T A N T
------------------------------------------------------------------
      ServerAdmin privilege key created, please use it to gain
      serveradmin rights for your virtualserver. please
      also check the doc/privilegekey_guide.txt for details.

       token=XXXXXXXXXXXXXXXXXXXXXXXXXXXXXXXXXXXXXXX
------------------------------------------------------------------
Now, start the TeamSpeak client on your machine, then log in with your credentials.
You can stop here, or continue configuring your TeamSpeak 3 server.
Configuring the TeamSpeak 3 server
Create a configuration file "ts3server.ini" in the "ts3server" folder:
nano /home/teamspeak/ts3server/ts3server.ini
machine_id=
default_voice_port=9987
voice_ip=0.0.0.0
licensepath=
filetransfer_port=30033
filetransfer_ip=0.0.0.0
query_port=10011
query_ip=0.0.0.0
query_ip_whitelist=query_ip_whitelist.txt
query_ip_blacklist=query_ip_blacklist.txt
dbplugin=ts3db_sqlite3 #or ts3db_mysql
dbpluginparameter= #or ts3db_mysql.ini
dbsqlpath=sql/
dbsqlcreatepath=create_sqlite/ #or create_mysql
dbconnections=10
logpath=logs
logquerycommands=0
dbclientkeepdays=30
logappend=0
query_skipbruteforcecheck=0
I use "sqlite" and the default "9987" port (for MySQL, see the comments).
Creating a "MySQL" database for TeamSpeak 3
# mysql -u root -p your_password
mysql > CREATE DATABASE ts3server;
mysql > GRANT ALL on ts3server.* to ts3@localhost IDENTIFIED BY 'your_password';
Configuring the database
Create a configuration file "ts3db_mysql.ini" in the "ts3server" folder:
[config]
host=localhost
port=3306
username=ts3server
password=your_password
database=ts3server
socket=
TeamSpeak automatic startup script
Create the script in "/etc/init.d/teamspeak":
nano /etc/init.d/teamspeak
#!/bin/bash

TS_DIR="/home/teamspeak/ts3server"
TS_USER="teamspeak"
RUN_SCRIPT="ts3server_minimal_runscript.sh"
INI_FILE="ts3server.ini"

start_ts() {
echo "Starting the TeamSpeak server"
su $TS_USER $TS_DIR/$RUN_SCRIPT init=$TS_DIR/$INI_FILE > /dev/null &
}

stop_ts() {
echo "Stopping the TeamSpeak server"
skill -KILL -u $TS_USER > /dev/null
}

case "$1" in
start)
start_ts
;;
stop)
stop_ts
;;
restart)
stop_ts
sleep 2
start_ts
;;
*)
echo "Script usage: $0 {start|stop|restart}"
;;
esac
You can now start your teamspeak server:
/etc/init.d/teamspeak start
Starting the script at boot:
update-rc.d teamspeak defaults
A small tip for future updates: download the following script.
TeamSpeak server management web interface:
Creating the folder for the web interface:
mkdir /var/www/ts3server-web
Moving into the "ts3server-web" folder:
cdd /var/www/ts3server-web
Downloading the "ts3wi.rar" archive:
wget -O ts3wi.rar "http://addons.teamspeak.com/index.php?option=com_mtree&task=att_download&link_id=53&cf_id=24"
Extracting the archive:
unrar ts3wi.rar
Adding web server permissions on the "ts3server-web" folder:
chown -R www-data:www-data /var/www/ts3server-web
Setting the web interface to French:
nano /var/www/ts3server-web/config.php
Changing the "cfglang" variable:
$cfglang = "fr";
Despite a small font encoding issue, the interface is indeed available:
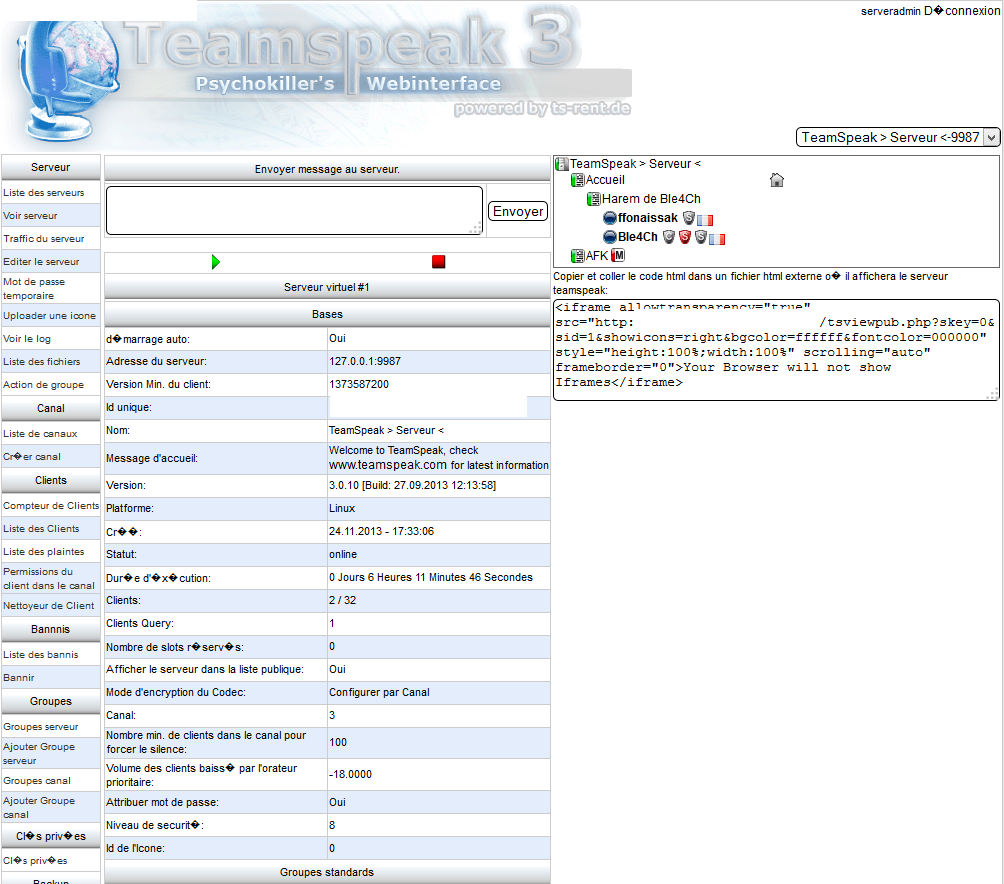
The TeamSpeak 3 server is up and running, all that's left is to customize it.
Conclusion
This article detailed the complete installation of a TeamSpeak 3 server on Debian 7: creating a dedicated user, downloading and configuring the server (SQLite or MySQL), setting up an automatic startup script, and adding a web management interface. This solution remains simple to deploy and quickly gives you a performant voice communication server that's light on bandwidth, for personal use or within a small community. All that's left is to customize permissions and channels according to your needs.