


The best of the Pound and Varnish reverse proxies! They let you further secure your servers. Speed up your requests, limit the number of visitors.
Real-world use case
You need to load-balance and cache your web applications: here's how to install the Pound and Varnish reverse proxies.
A reverse proxy is a type of server placed at the front line on the internet.
It lets an internet user access servers placed inside a LAN.
For more information on what a reverse proxy can do, check out Wikipedia.
Pound and Varnish are reverse proxies, and they'll be used to complement each other.
This article focuses on using an HTTPS to HTTP reverse proxy with a cache memory.
An interesting article on reverse proxy in 5 questions.
Reverse proxies: Pound and Varnish
Pound is a very lightweight and performant reverse proxy, capable of handling HTTPS requests, and it can balance the workload by sending web requests to the least busy machines.
Varnish is an HTTP accelerator, its role is to cache web requests.
Positioned ideally, it takes load off web servers, with very advanced configuration options thanks to its programming language: Varnish Configuration Language.
Using Pound and Varnish:
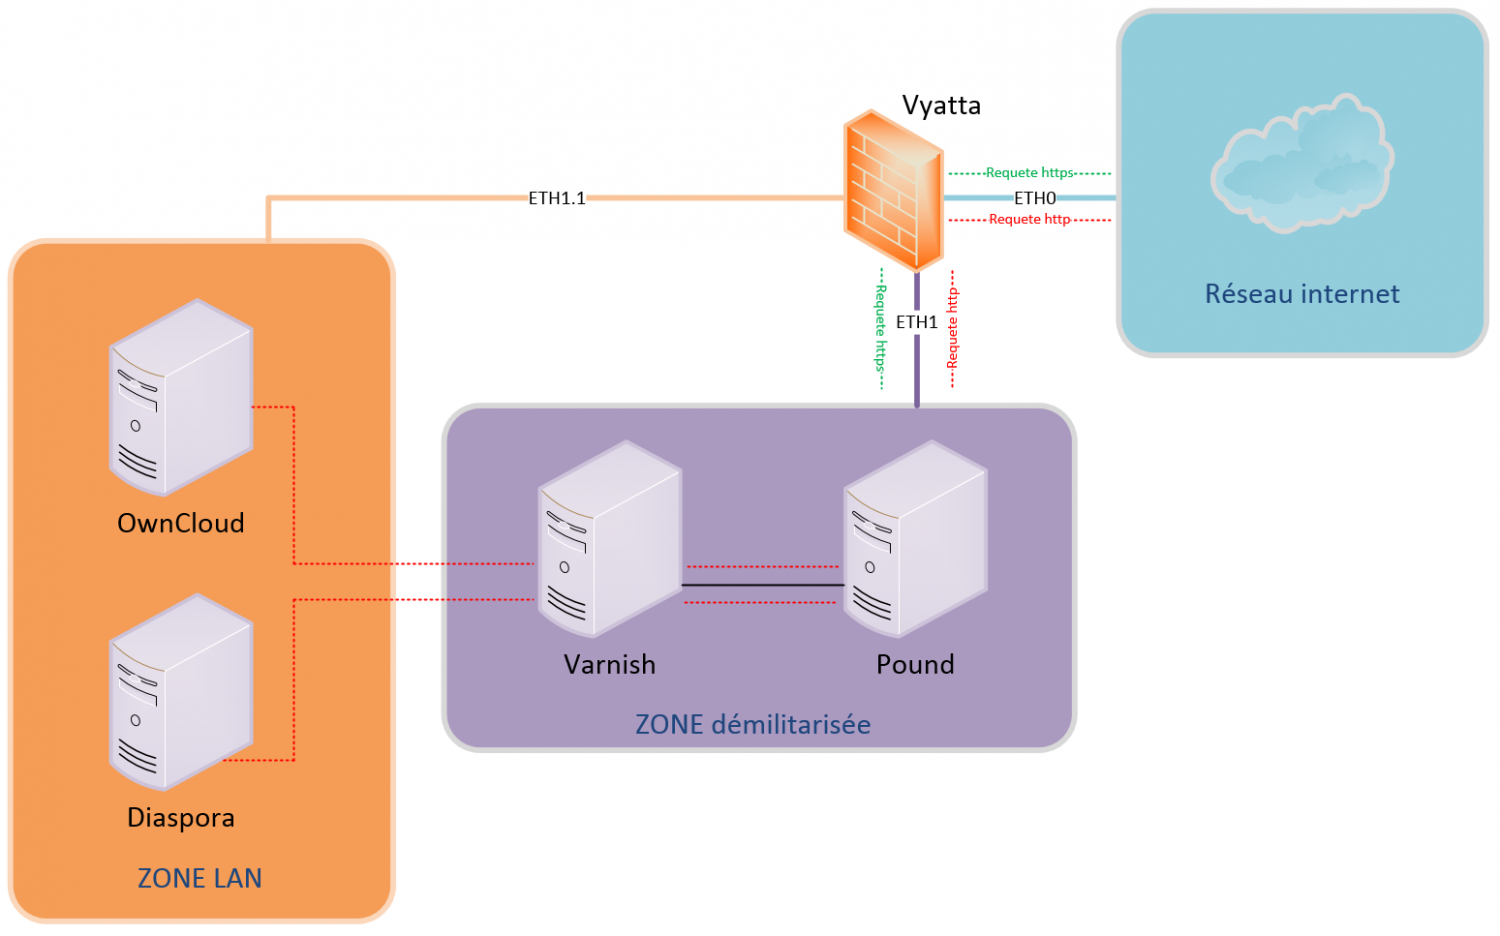
How it works in detail:
Vyatta divides our network into several zones: Blue, Purple, Orange.
The public IP (eth0) is NATed to Pound's private IP (eth1), and accepts protocols: 80 and 443.
Pound receives requests and forwards them to Varnish over HTTP.
Then, Varnish sends the request to one and/or the other of the servers: OwnCloud and/or Diaspora.
Inside our LAN, requests are in plain text, since Varnish doesn't work over HTTPS.
Every request handled by Varnish can be cached, depending on the configuration file.
In my article, Varnish and Pound will be installed on the same Debian 7 server:
- Pound will only be used as an HTTPS reverse proxy.
- Varnish will be used to handle http requests and cache them.
On top of providing web acceleration and software protection, High Scalability is possible.
Installing Pound version 2.6
Pound will be installed on the Debian 7 Linux distribution, in the stable version: Pound 2.6
We need to add the official Debian France repository to the source list:
nano /etc/apt/source.list
Add the mirror that contains the Pound package:
deb http://ftp.fr.debian.org/debian wheezy main
Sync your mirrors and install the available updates:
apt-get update && apt-get upgrade
Install Pound:
apt-get install pound
Configuring Pound version 2.6
Before starting, I recommend having Pound start at every boot:
nano /etc/default/pound
Change the following option:
startup=1
Next, the configuration file is pound.cfg, open it:
nano /etc/pound/pound.cfg
My configuration file:
## Minimal sample pound.cfg
##
## see pound(8) for details

######################################################################
## global options:

User            "www-data"
Group           "www-data"
#RootJail       "/chroot/pound"

## Logging: (goes to syslog by default)
##      0       no logging
##      1       normal
##      2       extended
##      3       Apache-style (common log format)
LogLevel        1

## check backend every X secs:
Alive           30

## use hardware-accelleration card supported by openssl(1):
#SSLEngine      ""

# poundctl control socket
Control "/var/run/pound/poundctl.socket"

######################################################################
## listen, redirect and ... to:

## redirect all requests on port 8080 ("ListenHTTP") to the local webserver (see "Service" below):
ListenHTTPS
        Address 192.168.0.2
        Port 443
        Cert "/etc/pound/ssl/owncloud/owncloud.kassianoff.pem"
        Cert "/etc/pound/ssl/diaspora/diaspora.kassianoff.pem"
        AddHeader "X-Forwarded-Proto: https"
        ## allow PUT and DELETE also (by default only GET, POST and HEAD)?:
        xHTTP           2
        Service
                BackEnd
                        Address 127.0.0.1
                        Port    80
                End
        End
End
Pound runs as the www-data user and listens on port 443 (https) on 192.168.0.2.
Two certificates are generated for the two subdomains: OwnCloud and Diaspora.
Check that the certificate name matches your domain name without the domain extension:
Cert "/etc/pound/ssl/domain_name/domain_name_.pem"
Varnish listens on port 80 and is installed on the same server as Pound, hence the "BackEnd".
The HTTPS request is sent to address 127.0.0.1 on port 80, and Varnish will continue the process. Info: to generate a self-signed certificate (source).
openssl req -x509 -newkey rsa:1024 -keyout local.server.pem -out local.server.pem -days 365 -nodes
A quick restart of Pound to apply the configuration:
/etc/init.d/pound restart
Pound's configuration is complete, for more information: head to the official site.
Installing Varnish
The Varnish package is available in the default mirrors:
apt-get install Varnish
Configuring Varnish
Varnish's configuration is much more complex, since it uses the VCL language.
Before diving into configuring Varnish, edit this file:
nano /etc/default/varnish
Change Varnish's listening port to "80":
# Configuration file for varnish
#
# /etc/init.d/varnish expects the variables $DAEMON_OPTS, $NFILES and $MEMLOCK
# to be set from this shell script fragment.
#
# Note: If systemd is installed, this file is obsolete and ignored.  You will
# need to copy /lib/systemd/system/varnish.service to /etc/systemd/system/ and
# edit that file.

# Should we start varnishd at boot?  Set to "no" to disable.
START=yes

# Maximum number of open files (for ulimit -n)
NFILES=131072

## Alternative 2, Configuration with VCL
#
# Listen on port 6081, administration on localhost:6082, and forward to
# one content server selected by the vcl file, based on the request.  Use a 1GB
# fixed-size cache file.
#
DAEMON_OPTS="-a :80
             -T localhost:6082
             -f /etc/varnish/default.vcl
             -S /etc/varnish/secret
             -p send_timeout=1800
             -s malloc,256m"
As specified in the "DAEMON_OPTS" variable, edit the default configuration file.
nano /etc/varnish/default.vcl
Here's Varnish's configuration using the VCL language:
# This is a basic VCL configuration file for varnish.  See the vcl(7)
# man page for details on VCL syntax and semantics.
#
# Default backend definition.  Set this to point to your content
# server.
#
backend owncloud {
    .host = "192.168.1.2";
    .port = "80";
}
backend diaspora {
    .host = "192.168.1.3";
    .port = "8080";
}
sub vcl_recv {
        if(req.http.host == "owncloud.kassianoff.fr"){
                   set req.backend = owncloud;
        }
        if(req.http.host == "diaspora.kassianoff.fr"){
                   set req.backend = diaspora;
        }

#if(req.http.authorization || req.request == "POST" || req.http.cookie){
#                   return(pass);
#        }

        return(pipe);
Add the two "Backends" with a distinct name for each of them, and enter "host" and "port".
Diaspora's WEB server's listening port has been changed for demonstration purposes.
The "sub vcl_recv" condition lets you choose the right "Backend" based on the request.
Varnish's configuration is complete, restart the process:
/etc/init.d/varnish reload
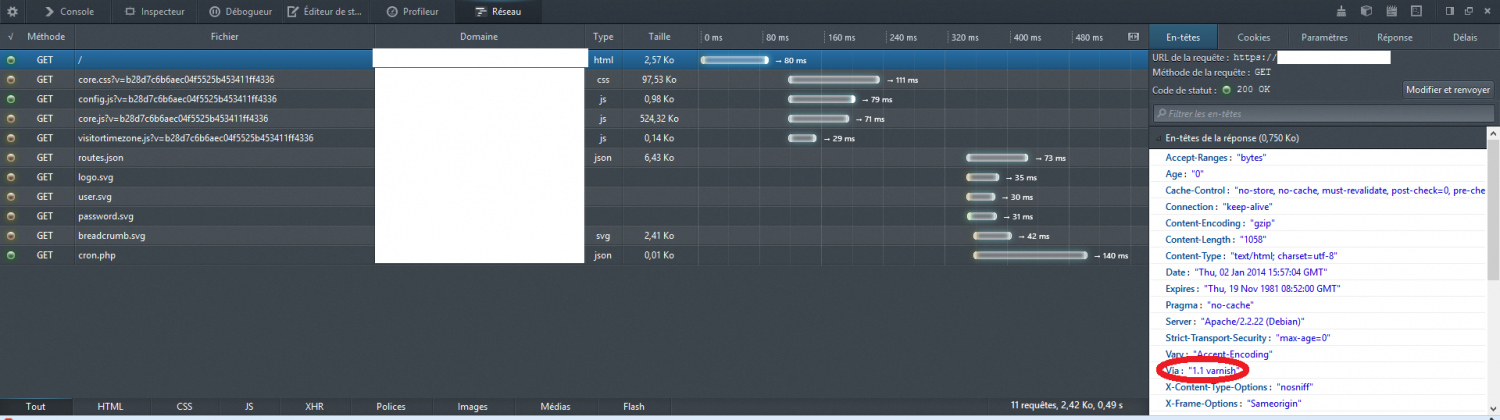
Once done, your HTTPS reverse proxy and the Varnish cache should be working.
As shown in the Firefox capture (web developer tools) on one of my subdomains:
Under ownCloud, several problems can come up, especially with file sharing.
In your ownCloud web server's "vhost", add:
RequestHeader add X-Forwarded-Proto https
Enable the "headers" mode with Apache2 :
a2enmod headers
The introduction to Pound and Varnish is complete, I encourage you to keep learning Varnish.