


Managing your home infrastructure isn't just about configuring your box or an antivirus. Discover how I secure my interconnections on a daily basis.
Real-world use case
Securing your home isn't limited to your ISP's box: here's how I structure my home infrastructure and my interconnections on a daily basis.
Managing your secure home infrastructure
Related to my article series: Choosing a well-managed home infrastructure
When setting up a home infrastructure where specific interconnections are needed, it's important to understand that this requires knowledge, since it's no longer a simple ISP box. As a result, managing an infrastructure takes time, motivation, and skills. Keep in mind that in case of a failure, you can't ask your Internet service provider for support, because all the changes were made by you and you alone are responsible for them.
The organization of my lab
- Prerequisites
- Configuration
- Conclusion
Prerequisites
In this lab I have the following hardware: a computer, a Freebox Revolution, an EdgeOS router, a Cisco switch, and a server running Debian 8. Note that all EdgeOS commands are compatible with vyOS (open source), which uses the same syntax.
It's essential to have the latest current firmware; in my case:
– My EdgeOS router: v1.8 (upgrade help for ubiquiti).
– My Cisco switch: v1.4.2.4 (upgrade help for cisco).
On the first startup of the router or switch, there are two available methods to connect to it:
- Via the front console port: with an RJ45 cable for ubiquiti and an RS232 for Cisco.
- Via an Ethernet port: where your machine will need to be on the 192.168.1.0/24 network.
The configuration
As part of the configuration I want, it's necessary to follow all the steps below. Of course, they'll then allow us to have a functional, secure, and fast network. Let's now see how I configured my home network in its entirety.
Enabling bridge mode on the Freebox Revolution
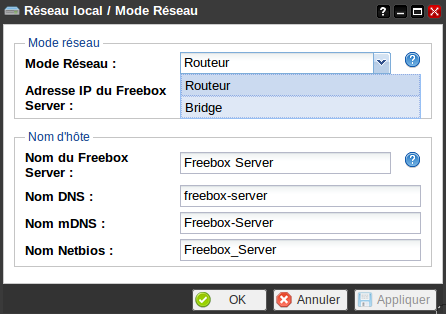
I no longer want my Freebox to be the main routing element in my network; to do that, I need to put it in bridge mode: let's go to our device's IP address 192.168.1.254 and enable bridge mode:
- Go to Freebox OS.
- In Freebox Settings, click Advanced Mode and go to Network Mode.
- In the Network Mode field, choose Bridge and confirm with OK.
- A message reminds you of the services disabled in bridge mode.
Here's an illustration of the Freebox web interface:
A warning is displayed: of course, you'll need to accept losing certain features:
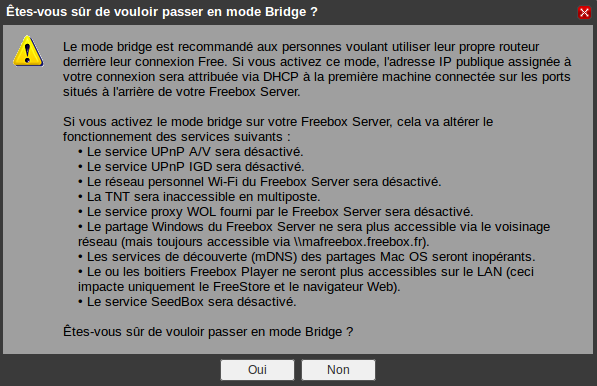
If Wi-Fi is your primary connection source, you'll need to invest in a Wi-Fi router since the feature will no longer be provided in bridge mode. You're still free to decline, or otherwise opt for 4G!
First connection to the router: EdgeOS/vyOS
By default the port is eth0 with the IP address: 192.168.1.1 (in my case I configured the eth7 interface as 192.168.100.1/24).
It's accessible via SSH on port 22 or via the web interface over http.
Info: The default credentials are ubnt/ubtn; otherwise here's a list of terminal emulators (port 115200).
ssh [email protected]
When it appears in the terminal, here's the first command to run:
configure
Now in configuration mode, we're ready to replace our box with an EdgeOS router.
Configuring a bridge interface
In our case we have the Freebox server connected on port eth0 and the Freebox player on port eth1.
We'll need to make them communicate with each other via a bridge interface:
set interfaces bridge br0
set interfaces bridge br0 vif 100 description "Freebox"
The Freebox server interface will automatically get an IP address (WAN) from Free:
set interfaces ethernet eth0 adresses dhcp
The interfaces of the two Freebox boxes will be in the same VLAN:
set interfaces ethernet eth0 vif 100 description "Freebox Serveur"
set interfaces ethernet eth1 vif 100 description "Freebox Player"
Then, we'll need to connect the vlan-100 interfaces into our bridge:
set interfaces ethernet eth0 vif 100 bridge-group bridge br0
set interfaces ethernet eth1 vif 100 bridge-group bridge br0
Info: To enable getting an IP on the Freebox player, you need to enable an option. Go to the menu: TV box System Settings, then enable DHCP client in bridge mode.
I invite you to make your first save with the command:
commit
For our configuration to be permanently saved:
save
The vlan interfaces
I use VLAN interfaces on each of my physical ports: these are tagged sub-interfaces.
Here's the configuration of my vlan interfaces:
set interfaces ethernet eth2 vif 200 adresse 192.168.20.1/28
set interfaces ethernet eth2 vif 200 description "home-multimedia"

set interfaces ethernet eth3 vif 300 address 192.168.30.1/28
set interfaces ethernet eth3 vif 300 description "home-domotique"

set interfaces ethernet eth4 vif 400 address 192.168.40.1/28
set interfaces ethernet eth4 vif 400 description "home-production"

set interfaces ethernet eth5 vif 500 address 192.168.50.1/28
set interfaces ethernet eth5 vif 500 description "home-sensible"

set interfaces ethernet eth6 vif 600 address 192.168.60.1/28
set interfaces ethernet eth6 vif 600 description "home-wifi"

set interfaces ethernet eth7 vif 700 address 192.168.70.1/28
set interfaces ethernet eth7 vif 700 description "home-vpn"
The source NAT service
For the different networks to be able to reach the outside, we need to add NAT rules for them:
set service nat rule 5000 description "freebox"
set service nat rule 5000 outbound-interface br0.100
set service nat rule 5000 protocol all
set service nat rule 5000 source address 192.168.1.0/24
set service nat rule 5000 type masquerade

set service nat rule 5000 description "multimedia"
set service nat rule 5001 outbound-interface eth0
set service nat rule 5001 source address 192.168.20.0/28
set service nat rule 5001 type masquerade

set service nat rule 5000 description "domotique"
set service nat rule 5002 outbound-interface eth0
set service nat rule 5002 source address 192.168.30.0/28
set service nat rule 5002 type masquerade

set service nat rule 5000 description "production"
set service nat rule 5003 outbound-interface eth0
set service nat rule 5003 source address 192.168.40.0/28
set service nat rule 5003 type masquerade

set service nat rule 5000 description "sensible"
set service nat rule 5004 outbound-interface eth0
set service nat rule 5004 source address 192.168.50.0/28
set service nat rule 5004 type masquerade

set service nat rule 5000 description "wifi"
set service nat rule 5005 outbound-interface eth0
set service nat rule 5005 source address 192.168.60.0/28
set service nat rule 5005 type masquerade

set service nat rule 5000 description "vpn"
set service nat rule 5006 outbound-interface eth0
set service nat rule 5006 source address 192.168.70.0/28
set service nat rule 5006 type masquerade
At this point the designated networks are able to reach the internet (unsecured link).
First connection to the switch: IOS
Your machine will need to be plugged into one of the switch's ports, the default IP address 192.168.1.254.
By default it's only accessible via the web interface over http with the credential pair: cisco/cisco.
We'll work only in the CLI via the SSH service.
Basic configuration
We have a Cisco switch that will interconnect all our hosts (machines) on the network.
Everything must be able to communicate with our edgeOS router; let's connect via SSH:
ssh [email protected]
Entering configuration mode and then changing the hostname is done like this:
r1#configure
r1(config)#hostname sg300
To exit configuration mode:
exit
Setting the local time is done like this:
sg300#clock set 21:23:10 18 may 2016
Then, it can be interesting to make the router aware of daylight saving/standard time like this:
sg300#clock summer-time GMT+2 recurring last Sun Mar 3:00 last Sun Oct 3:00
As a result, the time will be GMT+1 from the last Sunday of October until the last Sunday of March (winter time), and outside that range it will be summer time (GMT+2). Saving the configuration is done like this:
sg300#copy running-config startup-config
Overwrite file [startup-config].... (Y/N)[N] ?Y
19-May-2016 20:09:21 %COPY-I-FILECPY: Files Copy - source URL running-config destination URL flash://startup-config
19-May-2016 20:09:26 %COPY-N-TRAP: The copy operation was completed successfully
Copy succeeded
Enabling router mode
We're going to configure the switch in layer 3 mode to do routing:
sg300#set system mode router

Changing the switch working mode will *delete* the startup configuration file
and reset the device right after that. It is highly recommended that you will
backup it before changing the mode, continue ? (Y/N)[N] Y
The restart will take a few seconds.
VLAN configuration
sg300(config)# vlan 200, 300,400,500,600,700

sg300(config)#interface vlan 200
sg300(config-if)#name home-multimedia
sg300(config-if)# exit

sg300(config)#interface vlan 300
sg300(config-if)#name home-domotique
sg300(config-if)# exit

sg300(config)#interface vlan 400
sg300(config-if)#name home-production
sg300(config-if)# exit

sg300(config)#interface vlan 500
sg300(config-if)#name home-sensible
sg300(config-if)# exit

sg300(config)#interface vlan 600
sg300(config-if)#name home-wifi
sg300(config-if)# exit

sg300(config)#interface vlan 700
sg300(config-if)#name home-vpn
sg300(config-if)# exit
Info: If you make a mistake creating your vlan-IDs, use the command: sg300(config)# no vlan 100
We end up with the following result:
sg300#show vlans

Created by: D-Default, S-Static, G-GVRP, R-Radius Assigned VLAN, V-Voice VLAN

Vlan       Name           Tagged Ports      UnTagged Ports      Created by
---- ----------------- ------------------ ------------------ ----------------
 1           1                            gi1-20                    D
                                          Po1-8
200   home-multimedia                                               S
300   home-domotique                                                S
400   home-production                                               S
500    home-sensible                                                S
600      home-wifi                                                  S
700      home-vpn                                                   S
Configuring access ports
Adding a port to a VLAN is done in access mode like this:
sg300(config)#interface GigabiteEthernet 1
sg300(config-if)#description pc-fixe
sg300(config-if)#switchport mode access
sg300(config-if)#switchport access vlan 200

sg300(config)#interface GigabiteEthernet 2
sg300(config-if)#description pc-fixe
sg300(config-if)#switchport mode access
sg300(config-if)#switchport access vlan 200

sg300(config)#interface GigabiteEthernet 3
sg300(config-if)#description srv-intel-1
sg300(config-if)#switchport mode access
sg300(config-if)#switchport access vlan 500

sg300(config)#interface GigabiteEthernet 4
sg300(config-if)#description srv-intel-2
sg300(config-if)#switchport mode access
sg300(config-if)#switchport access vlan 500

sg300(config)#interface GigabiteEthernet 5
sg300(config-if)#description srv-raspberry
sg300(config-if)#switchport mode access
sg300(config-if)#switchport access vlan 500

sg300(config)#interface GigabiteEthernet 6
sg300(config-if)#description dom-hue
sg300(config-if)#switchport mode access
sg300(config-if)#switchport access vlan 300

sg300(config)#interface GigabiteEthernet 7
sg300(config-if)#description multimedia-PS3
sg300(config-if)#switchport mode access
sg300(config-if)#switchport access vlan 200
Configuring general ports
In this specific case, we want our (cisco) ports to connect to the ports of the (edgeOS) router. We'll use general mode, which is different from trunk. We tag our ports in general mode like this, allowing a link with the corresponding VLANs:
sg300(config)#interface GigabiteEthernet 9
sg300(config-if)#description home-multimedia
sg300(config-if)#switchport mode general
sg300(config-if)#switchport general pvid 200
sg300(config-if)#switchport general allowed vlan add 200

sg300(config)#interface GigabiteEthernet 10
sg300(config-if)#description home-domotique
sg300(config-if)#switchport mode general
sg300(config-if)#switchport general pvid 300
sg300(config-if)#switchport general allowed vlan add 300

sg300(config)#interface GigabiteEthernet 11
sg300(config-if)#description home-production
sg300(config-if)#switchport mode general
sg300(config-if)#switchport general pvid 400
sg300(config-if)#switchport general allowed vlan add 400

sg300(config)#interface GigabiteEthernet 12
sg300(config-if)#description home-sensible
sg300(config-if)#switchport mode general
sg300(config-if)#switchport general pvid 500
sg300(config-if)#switchport general allowed vlan add 500

sg300(config)#interface GigabiteEthernet 13
sg300(config-if)#description home-wifi
sg300(config-if)#switchport mode general
sg300(config-if)#switchport general pvid 600
sg300(config-if)#switchport general allowed vlan add 600

sg300(config)#interface GigabiteEthernet 14
sg300(config-if)#description home-vpn
sg300(config-if)#switchport mode general
sg300(config-if)#switchport general pvid 700
sg300(config-if)#switchport general allowed vlan add 700
Configuring the VLAN interfaces:
Layer 3 routing is currently in place on the switch. We'll configure each of the VLAN interfaces:
sg300(config)#interface vlan 200
sg300(config-if)# ip address 192.168.20.2 255.255.255.240

sg300(config)#interface vlan 300
sg300(config-if)# ip address 192.168.30.2 255.255.255.240

sg300(config)#interface vlan 400
sg300(config-if)# ip address 192.168.40.2 255.255.255.240

sg300(config)#interface vlan 500
sg300(config-if)# ip address 192.168.50.2 255.255.255.240

sg300(config)#interface vlan 600
sg300(config-if)# ip address 192.168.60.2 255.255.255.240

sg300(config)#interface vlan 700
sg300(config-if)# ip address 192.168.70.2 255.255.255.240
Once our interface configuration is complete, we'll save our work:
sg300#copy running-config startup-config
Overwrite file [startup-config].... (Y/N)[N] ?Y
25-Dec-2015 21:11:00 %LINK-W-Down:  gi6, aggregated (1)
25-Dec-2015 21:11:02 %LINK-I-Up:  gi6, aggregated (1)
25-Dec-2015 21:11:06 %STP-W-PORTSTATUS: gi6: STP status Forwarding, aggregated (1)
25-Dec-2015 21:12:46 %COPY-I-FILECPY: Files Copy - source URL running-config destination URL flash://startup-config
25-Dec-2015 21:12:50 %COPY-N-TRAP: The copy operation was completed successfully
Copy succeeded
sg300#25-Dec-2015 21:13:08 %LINK-W-Down:  gi6, aggregated (1)
25-Dec-2015 21:13:10 %LINK-I-Up:  gi6, aggregated (1)
25-Dec-2015 21:13:15 %STP-W-PORTSTATUS: gi6: STP status Forwarding, aggregated (1)
The desired interconnections are now in place.
The DHCP server
We also have the option of using automatic IP address assignment on the hosts present in our vlans. To do this, we simply use an essential service in every network, the DHCP server, and we have two possible cases:
- The Cisco switch (layer3)
sg300(config)# ip dhcp pool network multimedia-dhcp
sg300(config-dhcp)#network 192.168.20.0 255.255.255.240
sg300(config-dhcp)#dns-server 8.8.8.8
sg300(config-dhcp)#default-router 192.168.20.1
sg300(config-dhcp)#address low 192.168.20.3 high 192.168.20.14 255.255.255.240
- The Ubiquiti EdgeOS router
set service dhcp-server shared-network-name multimedia-dhcp
set service dhcp-server shared-network-name multimedia-dhcp subnet 192.168.20.0/28
set service dhcp-server shared-network-name multimedia-dhcp subnet 192.168.20.0/28 default-router 192.168.20.1
set service dhcp-server shared-network-name multimedia-dhcp subnet 192.168.20.0/28 dns-server 8.8.8.8
set service dhcp-server shared-network-name multimedia-dhcp subnet 192.168.20.0/28 start 192.168.20.3 stop 192.168.20.10
In my case I use the EdgeOS router.
Network security
We're in an environment segmented by VLANs and we have a CIDR mask per network. However, it would be wrong to think that we're secure against potential attackers. We'll still need to work to reach an acceptable level.
The mac address table: anti-spoofing
It's unlikely your mac address table changes very often. In a home environment, our devices are generally always the same. We'll modify our mac address table so that everything is secure, in order to guard against any forced change (spoofing attack).
Here's our table currently (type: dynamic by default):
sg300#show mac address-table
Flags: I - Internal usage VLAN
Aging time is 300 sec

    Vlan          Mac Address         Port       Type
------------ --------------------- ---------- ----------
     1         00:00:00:00:00:a1       0         self
    300        00:00:00:00:00:a2      gi6      dynamic
    300        00:00:00:00:00:a3      gi10     dynamic
    400        00:00:00:00:00:a4      gi11     dynamic
    400        00:00:00:00:00:a5      gi1      dynamic
We notice that the VLAN interfaces appear (gi6 and gi1) as well as the powered-on VLAN hosts (gi10 and gi11).
Port security: discard-shutdown
We have the option to set the port to static type, but it's important that an action on the port is triggered when a mac address changes: let's enable it in secure mode on the switch. Here's how to enable it:
sg300(config)#interface GE 6
sg300(config-if)#port security mode secure permanent
sg300(config-if)#port security discard-shutdown trap 60
We'll now secure our mac address in our table:
sg300(config)#mac address-table static 00:00:00:00:00:a2 vlan 300 interface GE 6 secure
When another mac address is detected on the port, it will be automatically disabled:
08-May-2016 18:44:21 %LINK-I-Up:  gi6, aggregated (1)
08-May-2016 18:44:26 %STP-W-PORTSTATUS: gi6: STP status Forwarding, aggregated (1)
08-May-2016 18:44:26 %LINK-W-PORT_SUSPENDED: Port gi6 suspended by port-security
We have the option to view the status of disabled ports:
sg300#show errdisable interfaces

  Interface         Reason
------------- ------------------
     gi6        port-security
We won't investigate further in our example; here's the method to bring the port back into service:
sg300#errdisable recovery reset interface GE 6
sg300#errdisable recovery cause08-Jan-2016 19:50:18 %LINK-I-Up:  gi6
sg300#08-Jan-2016 19:50:22 %STP-W-PORTSTATUS: gi6: STP status Forwarding
Ensuring better security on iOS
My switch doesn't communicate with the web directly; we disable DNS requests:
sg300(config)#no ip domain lookup
Disabling the Cisco Discovery Protocol (cdp) is absolutely necessary to ensure its security:
sg300(config)#no cdp run
Unsecured services such as http and telnet should also be avoided when managing security:
sg300(config)#no ip http server
sg300(config)#no ip telnet server
Disabling unused interfaces is essential so as not to leave an attacker with access to the switch:
sg300(config)#int GE 14
sg300(config-if)#shutdown
Changing the SSH server port to 18759, for example:
sg300(config)#ip ssh port 18759
We'll settle (for now) for the following security on the switch; let's go back and look at our router!
Firewall rules: edgeOS
We'll start with a simple firewall rule that consists of blocking so-called bogon IPs with the following list.
We create a firewall network group named: bogons network
set firewall group network-group bogons

set firewall group network-group bogons description "invalid wan networks"
set firewall group network-group bogons network 0.0.0.0/8
set firewall group network-group bogons network 10.0.0.0/8
set firewall group network-group bogons network 100.64.0.0/10
set firewall group network-group bogons network 127.0.0.0/8
set firewall group network-group bogons network 169.254.0.0/16
set firewall group network-group bogons network 172.16.0.0/12
set firewall group network-group bogons network 192.0.0.0/24
set firewall group network-group bogons network 192.0.2.0/24
set firewall group network-group bogons network 192.168.0.0/16
set firewall group network-group bogons network 198.18.0.0/15
set firewall group network-group bogons network 198.51.100.0/24
set firewall group network-group bogons network 203.0.113.0/24
set firewall group network-group bogons network 224.0.0.0/4
set firewall group network-group bogons network 240.0.0.0/4
We create the following firewall rule : internet (WAN)
set firewall name internet
set firewall name internet defaut-action drop
set firewall name internet rule 1 action accept
set firewall name internet rule 1 state estabished enable
set firewall name internet rule 1 related enable

set firewall name internet rule 2 action drop
set firewall name internet rule 2 log disable
set firewall name internet rule 2 state invalid enable

set firewall name internet rule 3 action drop
set firewall name internet rule 3 description "drop ipv4 bogons"
set firewall name internet rule 3 source group network-group bogons
We create the following firewall rule : Production-internet (inter-zone)
set firewall name production-internet
set firewall name production-internet defaut-action drop
set firewall name production-internet rule 1 action accept
set firewall name production-internet rule 1 state estabished enable
set firewall name production-internet rule 1 related enable

set firewall name production-internet rule 2 action drop
set firewall name production-internet rule 2 log disable
set firewall name production-internet rule 2 state invalid enable

set firewall name production-internet rule 3 action accept
set firewall name production-internet rule 3 description "allow ping"
set firewall name production-internet rule 3 log enable
set firewall name production-internet rule 3 protocop icmp

set firewall name production-internet rule 4 action accept
set firewall name production-internet rule 4 description "allow dns"
set firewall name production-internet rule 4 port 53
set firewall name production-internet rule 4 log enable
set firewall name production-internet rule 4 protocop icmp

set firewall name production-internet rule 5 action accept
set firewall name production-internet rule 5 description "allow webpage traffic"
set firewall name production-internet rule 5 destination port 80,443
set firewall name production-internet rule 5 log enable
set firewall name production-internet rule 5 protocop tcp

set firewall name production-internet rule 6 action accept
set firewall name production-internet rule 6 description "allow ftp"
set firewall name production-internet rule 6 destination port 20,21
set firewall name production-internet rule 6 log enable
set firewall name production-internet rule 6 protocop tcp

set firewall name production-internet rule 7 action accept
set firewall name production-internet rule 7 description "allow ssh"
set firewall name production-internet rule 7 destination port 22
set firewall name production-internet rule 7 log enable
set firewall name production-internet rule 7 protocop tcp

set firewall name production-internet rule 8 action accept
set firewall name production-internet rule 8 description "allow vnc"
set firewall name production-internet rule 8 destination port 5900-5910
set firewall name production-internet rule 8 protocop tcp

set firewall name production-internet rule 9 action accept
set firewall name production-internet rule 9 description "allow openvpn"
set firewall name production-internet rule 9 destination port 1194
set firewall name production-internet rule 9 protocop tcp_udp
We create the following firewall rule : multimedia-internet (inter-zone)
set firewall name multimedia-internet
set firewall name multimedia-internet defaut-action drop
set firewall name multimedia-internet rule 1 action accept
set firewall name multimedia-internet rule 1 state estabished enable
set firewall name multimedia-internet rule 1 related enable

set firewall name multimedia-internet rule 2 action drop
set firewall name multimedia-internet rule 2 log disable
set firewall name multimedia-internet rule 2 state invalid enable

set firewall name multimedia-internet rule 3 action accept
set firewall name multimedia-internet rule 3 description "allow ping"
set firewall name multimedia-internet rule 3 log enable
set firewall name multimedia-internet rule 3 protocop icmp

set firewall name multimedia-internet rule 4 action accept
set firewall name multimedia-internet rule 4 description "allow dns"
set firewall name multimedia-internet rule 4 port 53
set firewall name multimedia-internet rule 4 log enable
set firewall name multimedia-internet rule 4 protocop icmp

set firewall name multimedia-internet rule 5 action accept
set firewall name multimedia-internet rule 5 description "allow webpage traffic"
set firewall name multimedia-internet rule 5 destination port 80,443
set firewall name multimedia-internet rule 5 log enable
set firewall name multimedia-internet rule 5 protocop tcp
We create the following firewall rule : sensible-internet (inter-zone)
set firewall name sensible-internet
set firewall name sensible-internet defaut-action drop
set firewall name sensible-internet rule 1 action accept
set firewall name sensible-internet rule 1 state estabished enable
set firewall name sensible-internet rule 1 related enable

set firewall name sensible-internet rule 2 action drop
set firewall name sensible-internet rule 2 log disable
set firewall name sensible-internet rule 2 state invalid enable

set firewall name sensible-internet rule 3 action accept
set firewall name sensible-internet rule 3 description "allow ping"
set firewall name sensible-internet rule 3 log enable
set firewall name sensible-internet rule 3 protocop icmp

set firewall name sensible-internet rule 4 action accept
set firewall name sensible-internet rule 4 description "allow dns"
set firewall name sensible-internet rule 4 port 53
set firewall name sensible-internet rule 4 log enable
set firewall name sensible-internet rule 4 protocop icmp

set firewall name sensible-internet rule 5 action accept
set firewall name sensible-internet rule 5 description "allow webpage traffic"
set firewall name sensible-internet rule 5 destination port 80,443
set firewall name sensible-internet rule 5 log enable
set firewall name sensible-internet rule 5 protocop tcp
We create the following firewall rule : domotique-internet (inter-zone)
set firewall name domotique-internet
set firewall name domotique-internet defaut-action drop
set firewall name domotique-internet rule 1 action accept
set firewall name domotique-internet rule 1 state estabished enable
set firewall name domotique-internet rule 1 related enable

set firewall name domotique-internet rule 2 action drop
set firewall name domotique-internet rule 2 log disable
set firewall name domotique-internet rule 2 state invalid enable

set firewall name domotique-internet rule 3 action accept
set firewall name domotique-internet rule 3 description "allow ping"
set firewall name domotique-internet rule 3 log enable
set firewall name domotique-internet rule 3 protocop icmp

set firewall name domotique-internet rule 4 action accept
set firewall name domotique-internet rule 4 description "allow dns"
set firewall name domotique-internet rule 4 port 53
set firewall name domotique-internet rule 4 log enable
set firewall name domotique-internet rule 4 protocop icmp

set firewall name domotique-internet rule 5 action accept
set firewall name domotique-internet rule 5 description "allow webpage traffic ssl"
set firewall name domotique-internet rule 5 destination port 443
set firewall name domotique-internet rule 5 log enable
set firewall name domotique-internet rule 5 protocop tcp
We create the following firewall rule : wifi-internet (inter-zone)
set firewall name wifi-internet
set firewall name wifi-internet defaut-action drop
set firewall name wifi-internet rule 1 action accept
set firewall name wifi-internet rule 1 state estabished enable
set firewall name wifi-internet rule 1 related enable

set firewall name wifi-internet rule 2 action drop
set firewall name wifi-internet rule 2 log disable
set firewall name wifi-internet rule 2 state invalid enable

set firewall name wifi-internet rule 3 action accept
set firewall name wifi-internet rule 3 description "allow ping"
set firewall name wifi-internet rule 3 log enable
set firewall name wifi-internet rule 3 protocop icmp

set firewall name wifi-internet rule 4 action accept
set firewall name wifi-internet rule 4 description "allow dns"
set firewall name wifi-internet rule 4 port 53
set firewall name wifi-internet rule 4 log enable
set firewall name wifi-internet rule 4 protocop icmp

set firewall name wifi-internet rule 5 action accept
set firewall name wifi-internet rule 5 description "allow webpage traffic"
set firewall name wifi-internet rule 5 destination port 80,443
set firewall name wifi-internet rule 5 log enable
set firewall name wifi-internet rule 5 protocop tcp
We create the following firewall rule : vpn-internet (inter-zone)
set firewall name vpn-internet
set firewall name vpn-internet defaut-action drop
set firewall name vpn-internet rule 1 action accept
set firewall name vpn-internet rule 1 state estabished enable
set firewall name vpn-internet rule 1 related enable

set firewall name vpn-internet rule 2 action drop
set firewall name vpn-internet rule 2 log disable
set firewall name vpn-internet rule 2 state invalid enable

set firewall name vpn-internet rule 3 action accept
set firewall name vpn-internet rule 3 description "allow ping"
set firewall name vpn-internet rule 3 log enable
set firewall name vpn-internet rule 3 protocop icmp

set firewall name vpn-internet rule 4 action accept
set firewall name vpn-internet rule 4 description "allow dns"
set firewall name vpn-internet rule 4 port 53
set firewall name vpn-internet rule 4 log enable
set firewall name vpn-internet rule 4 protocop icmp

set firewall name vpn-internet rule 5 action accept
set firewall name vpn-internet rule 5 description "allow ssh"
set firewall name vpn-internet rule 5 destination port 22
set firewall name vpn-internet rule 5 log enable
set firewall name vpn-internet rule 5 protocop tcp
We create the following firewall rule : sensible-production (inter-zone)
We create the following firewall rule : production-sensible (inter-zone)
Zone policies
Zone policies let you restrict one or more interfaces to a single, fully closed zone.
They work in pairs (e.g. "internet > multimedia" and "multimedia > internet"), and the firewall rules will allow that pair of zones to communicate with each other or not.
Here's my configuration internet > multimedia, domotique, production, sensible, wifi, vpn with their firewall rules.
set zone-policy zone internet
set zone-policy zone internet defaut-action drop

set zone-policy zone internet from multimedia firewall name multimedia-internet
set zone-policy zone internet from domotique firewall name domotique-internet
set zone-policy zone internet from production firewall name production-internet
set zone-policy zone interent from sensible firewall name sensible-internet
set zone-policy zone internet from wifi firewall name wifi-internet
set zone-policy zone internet from vpn firewall name vpn-internet

set zone-policy zone internet interfaces eth0
set zone-policy zone internet interfaces eth1
Here's my multimedia > internet configuration with its firewall rule
set zone-policy zone multimedia
set zone-policy zone multimedia defaut-action drop
set zone-policy zone multimedia from internet firewall name internet
set zone-policy zone multimedia interfaces eth2.200
Here's my domotique > internet configuration with its firewall rule
set zone-policy zone domotique
set zone-policy zone domotique defaut-action drop
set zone-policy zone domotique from internet firewall name internet
set zone-policy zone domotique interfaces eth3.300
Here's my production > internet configuration with its firewall rule
set zone-policy zone production
set zone-policy zone production defaut-action drop
set zone-policy zone production from internet firewall name internet
set zone-policy zone production interfaces eth4.400
Here's my sensible > internet configuration with its firewall rule
set zone-policy zone sensible
set zone-policy zone sensible defaut-action drop
set zone-policy zone sensible from internet firewall name internet
set zone-policy zone sensible interfaces eth5.500
Here's my wifi > internet configuration with its firewall rule
set zone-policy zone wifi
set zone-policy zone wifi defaut-action drop
set zone-policy zone wifi from internet firewall name internet
set zone-policy zone wifi interfaces eth6.600
Here's my vpn > internet configuration with its firewall rule
set zone-policy zone vpn
set zone-policy zone vpn defaut-action drop
set zone-policy zone vpn from internet firewall name internet
set zone-policy zone vpn interfaces eth7.700
We added our corresponding interfaces in each of the zones so that the firewall rules are active.
Deep Packet Inspection
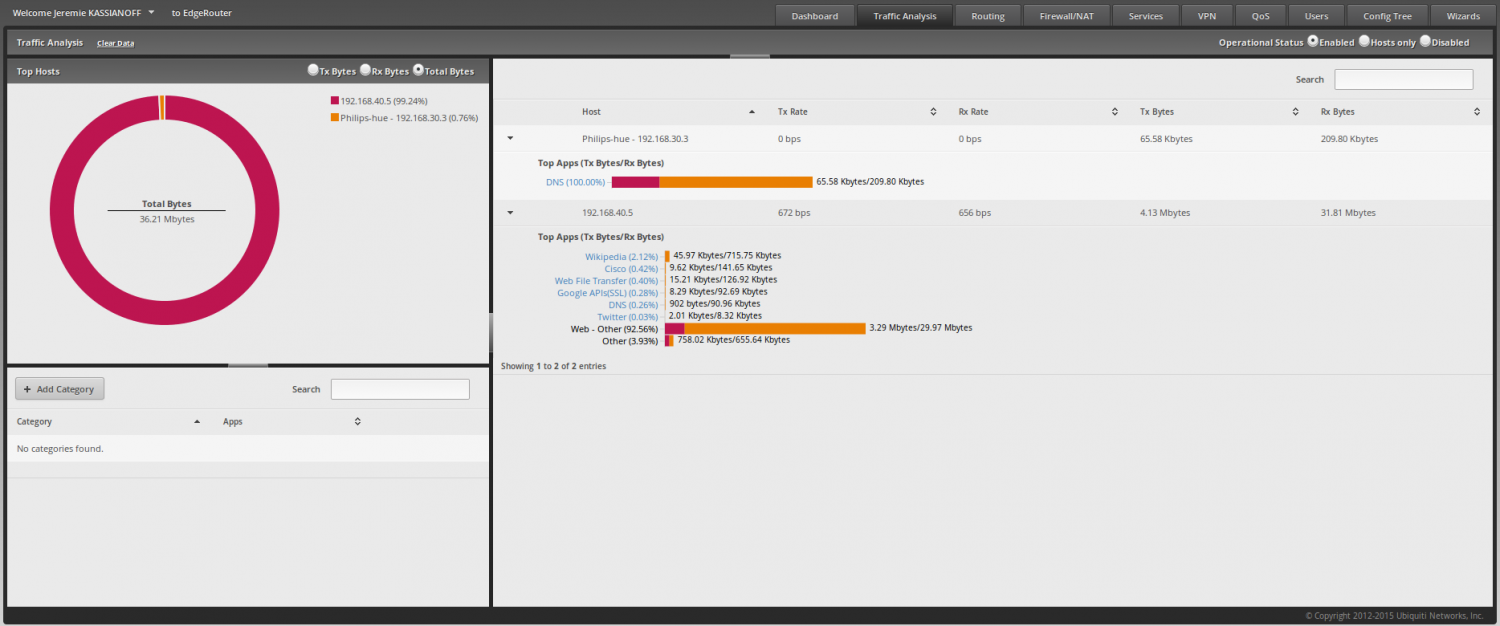
A DPI feature is offered on the edgeOS router; you have the option to enable it:
set system traffic-analysis dpi enable
Then go to your router's web interface in the tab:
Proxy server
The (transparent) proxy server is an important element, since it lets you avoid certain categories of known sites while browsing the web. For example, I block certain categories of sites such as:
ads mixed_adult remote-control adult cdrogue lingerie sect tricheur aggressive drugs phishing sexual_education agressif childliste_bu porn violence arjel warez associations_religieuses proxy
astrology dangerous_material publicite special dating gambling malware ddos reaffected strict_redirector dialer hacking marketingware redirector strong_redirector
It's important to regularly update the lists of these sites like this:
set service webproxy url-filtering squidguard auto-update update-hour 2
Or to manually force the update:
update webproxy blacklists
Now we'll configure the proxy so it blocks a category such as:
set service webproxy url-filtering squidguard block-category adult
Secure management: edgeOS
We'll generate a public/private key pair on our operating system (Linux in my case):
ssh-keygen -t rsa
We then copy the public key to the remote device (for example to the edgeOS router)
ssh-copy-id -i /home/jeremie/.ssh/id_rsa.pub [email protected]

/usr/bin/ssh-copy-id: INFO: attempting to log in with the new key(s), to filter out any that are already installed
/usr/bin/ssh-copy-id: INFO: 1 key(s) remain to be installed -- if you are prompted now it is to install the new keys
[email protected]'s password:

Number of key(s) added: 1

Now try logging into the machine, with:   "ssh [email protected]"
and check to make sure that only the key(s) you wanted were added.
If you want to disable SSH password authentication on edgeOS:
set service ssh disable-password-authentication
Secure management: iOS
Similarly, we'll configure the switch's SSH server with our public key:
sg300#configure
sg300(config)#ip ssh server
sg300(config)#ip ssh pubkey-auth auto-login
sg300(config)#username jeremie password "mypassword" privilege 15
sg300(config)#crypto key pubkey-chain ssh
sg300(config-pubkey-chain)#user-key jeremie rsa
sg300(config-pubkey-key)#key-string

<paste the content of your public key (/home/jeremie/.ssh/id_rsa.pub)>

Fingerprint: ee:3a:80:vc:49:00:1r:12:36:17:b4:ff:e7:60:rv:19
sg300(config-pubkey-key)#exit
sg300(config-pubkey-chain)#exit
sg300(config)#exit
sg300#show crypto key pubkey-chain ssh
   Username                              Fingerprint
-------------- ---------------------------------------------------------------
  jeremie           ee:3a:80:vc:49:00:1r:12:36:17:b4:ff:e7:60:rv:19
The next connection to the router and the switch will be more secure and faster with this method.