


Getting hands-on: JunOS 12.3R7.7 Getting started with JunOS, Juniper Network's system. CLI mode configuration on EX4200.

Real-world use case
You're getting hands-on with a Juniper router for the first time: here are the essential basic commands under Junos 12.3R7.7.
Juniper Network: JunOS
Juniper Network is a major player in network telecommunications equipment & security.
JunOS is one of Juniper's operating systems, handling networking, routing, security, and SDN.
Juniper's operating system is based on FreeBSD, which gives it a solid, reliable character.
JunOS is also a UNIX philosophy: "Do one thing, and do it well"!
In this article I use 3 EX4200 switches in virtual chassis mode under JunOS 12.3R7.7.
To understand the virtual chassis, an article will soon be available (Dec 2014).
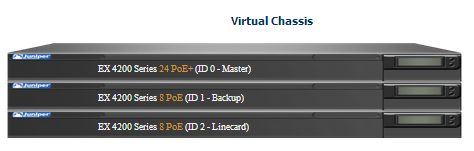
Since the price is very high, I recommend investing in an SRX-100 model (~€300).
Or, try Firefly Perimeter's free evaluation version as an OVA on your ESXi for free!
Getting started with JunOS
To properly get started with JunOS, you need a bit of theory, but mostly a lot of practice.
On the device's first boot (EX, SRX, Perimeter, etc…), JunOS shows us:
Amnesiac (ttyd0)
So we understand the JunOS system is amnesiac and doesn't know about any previous connection.
On first login, we'll log in with the superuser: root (with no password).
login : root
Usually, a welcome message appears on our screen, and we enter cli mode.
root@% cli
We're now logged in as root on the JunOS system.
After running the cli command, we're in what's called operational mode.
The two main modes
Identifying which mode you're in is essential, and it's not complicated at all:
- Operational mode lets you manage and control the device's activities.
To recognize operational mode, just check that the "prompt" sign is a ">".bashroot@juex1_24p> - Configuration mode lets you configure the device (networking, security, etc…).
To recognize configuration mode, just check that the "prompt" sign is a "#".bashroot@juex1_24p#
Just like on Unix, we find the "prompt" that lets us know where we stand.
In this example, we're logged in as root on the "juex1_24p" device.
We're now ready to understand JunOS's hierarchy.
The hierarchy system
Juniper Network uses three hierarchical levels, this is an important theoretical concept.
When we configure the device under JunOS, we're required to use this hierarchy.
This hierarchy is represented as a tree, for example: the trunk, the branch, the leaf.
For example, here's a configuration file for two ge (gigabit ethernet) interfaces:
interfaces {
    ge-0/0/0 {
        unit 0 {
            family inet {
                address 192.168.0.25/24;
            }
        }
    }
    ge-0/0/1 {
        unit 0 {
            family inet {
                address 192.168.0.26/24;
            }
        }
    }
}
- "interfaces" is the highest node level, it's the top level (the trunk).
- "ge-0/0/0" and "ge-0/0/01" are both subordinates of the container (the branch).
- "address 192.168.0.25/24" is a statement specific to the subordinate (the leaf).
If you're having trouble with this concept, here are examples of hierarchical configuration.
Now, we're ready to dive into JunOS's basic configuration!
Basic configuration under Junos
To start configuring Junos, we'll begin with the following points:
- Add the following system users: root and admin.
- Change the hostname and add a time zone.
- Remove the http service and configure the https service.
- Configure the SSH service.
- Configure two Gigabit interfaces.
- Add a DNS configuration to the system.
- Set up a static route toward the network's gateway.
- Create a DHCP pool for the local network.
To switch to configuration mode under Junos (after a cli):
configure
Adding a password for "root"
set systeme root-authentication plaintext-password
New password:
Retype new password:
Adding an administrator user:
set system login user admin class super-user authentication plain-text-password
New password:
Retype new password:
Changing the hostname
set system host-name juvsrx01
Adding a time zone
set system time-zone Europe/Paris
Changing the date:
set date 201410011458.00
Removing web access via "http"
delete system services web-management http
Adding the "https" web service
set system services web-management https system-generated-certificate
Adding the "ssh" service
set system services ssh
Configuring a gigabit interface 0/0/0
set interfaces ge-0/0/0 unit 0 family inet address 192.168.0.2/24
Configuring a gigabit interface 0/0/1
set interfaces ge-0/0/1 unit 0 family inet address 192.168.1.1/24
Configuring DNS resolution
set system name-server 213.186.33.199
Adding a route to the gateway
set routing-options static route 0.0.0.0/0 next-hop 192.168.0.1
Configuring a DHCP POOL
set system services dhcp pool 192.168.1.0/24
set system services dhcp pool 192.168.1.0/24 address-range low 192.168.1.1 high 192.168.1.254
set system services dhcp pool 192.168.1.0/24 name-server 213.186.33.199
set system services dhcp pool 192.168.1.0/24 router 192.168.1.1
set system services dhcp pool 192.168.1.0/24 exclude-address 192.168.1.1
Validating changes under JunOS
There are several methods to validate configuration changes in the JunOS system:
- The first lets you check best practices before making a final change:
commit check
- The second directly applies changes without any prior check:
commit
I encourage you to use the first method, especially to avoid unpleasant surprises, such as getting kicked out of an SSH connection. Stay careful!
To keep learning JunOS, head to the official website and to support!
Conclusion
I've laid out here the essential basics for administering a JunOS device: user management, hostname, SSH/HTTPS, network interfaces, DNS resolution, static route, and DHCP pool. This basic configuration forms the foundation on which more advanced topics, like the virtual chassis or security rules, later build. I recommend systematically using commit check before validating your changes to avoid any unpleasant surprises, especially losing SSH access.